Hello dear Amigurumi Followers Today we share one free amigurumi crochet pattern again for you. As you know we share new amigurumi free patterns every day. The main crochets are amigurumi gazelles, amigurumi bears, amigurumi polar bears, amigurumi pandas, amigurumi penguins, amigurumi giraffes, amigurumi llama, amigurumi pigs, amigurumi bunny, amigurumi clowns, amigurumi lambs, amigurumi bees, amigurumi unicorns, amigurumi dolls, amigurumi foxes, amigurumi penguins, amigurumi dinosaurs, amigurumi elephants, amigurumi hippos, amigurumi monkeys, amigurumi cats, amigurumi dogs and more … Todays daily new amigurumi free crochet pattern is Amigurumi Doll. I want to give you some informations about this pattern ;
– Worsted weight yarn – approx. 90 yards yellow, 20 yards gold, 70 yards dark pink, 30 yards brown, 40 yards green (I used Lion Brand 24/7 cotton in Lemon, Camel, Magenta, Café au Lait and Grass) – Suggested hook size: 3.25mm (D) – 2 x 12mm safety eyes – Blush
– Yarn needle
– Poly-fil
Other materials needed: – Small piece of cardboard
– Weight for the bottom of the pot (I used decorative glass rocks)
– Stem support (I used a foam hair roller and a chopstick)
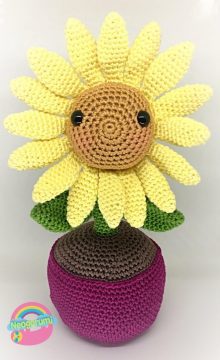
My flower measures approximately 11’ tall when made with the above materials.
You can use any weight yarn or thread that you are comfortable using, just adjust your hook size accordingly.
Stitch abbreviations:
Sc: single crochet
Hdc: half double crochet
Dc: double crochet
Tr: treble crochet
Inc: increase
Dec: decrease
Sl st: slip stitch
Ch: chain
**Pattern is worked in continuous rounds unless stated otherwise**
Petals
(Make 16 – in yellow)
R1: 4 sc in magic ring
R2: (1 sc, sc inc) x 2 (6)
R3: (1 sc, sc inc) x 3 (9)
R4: 9 sc (9)
R5: (2 sc, sc inc) x 3 (12) R6-9: 12 sc (12)
R10: (4 sc, sc dec) x 2 (10)
R11; (3 sc, sc dec) x 2 (8)
R12: 8 sc (8) R12: (sc dec, 2 sc) x 2 (6)
R21: Do not stuff – flatten the petal and 3 sc across both sides of the top of the to close
Fasten off.
Flower center
(Make 1 – starting in gold)
R1: 6 sc in magic ring (6) R2: sc inc x 6 (12) R3: (1 sc, sc inc) x 6 (18) R4: (2 sc, sc inc) x 6 (24)
R5: (3 sc, sc inc) x 6 (30) R6: (4 sc, sc inc) x 6, (36) R7: (5 sc, sc inc) x 6 (42)
R8: (6 sc, sc inc) x 6 (48)
R9-11: 48 sc (48) Change to green on the last st of R11.
R12: 48 sc (48)
R13: (4 sc, sc dec) x 8 (40)
R14: (3 sc, sc dec) x 8 (32)
Insert safety eyes between R6 & 7.
R15: (2 sc, sc dec) x 8 (24)
Start stuffing.
R16: (2 sc sc dec) x 6 (18)
R17: (1 sc, sc dec) x 6 (12)
R18: sc dec x 6 (6) Finish stuffing and fasten off. Weave in ends.
Sew all 16 petals around the flower center, between R10 & 11.
Pot
(Make 1 – in dark pink)
R1: 7 sc in magic ring (7)
R2: sc inc x 7 (14)
R3: (1 sc, sc inc) x 7 (21)
R4: (2 sc, sc inc) x 7 (28)
R5: (3 sc, sc inc) x 7 (35)
R6: (4 sc, sc inc) x 7 (42)
R7: (5 sc, sc inc) x 7 (49)
R8: (6 sc, sc inc) x 7 (56)
R9: 56 sc BLO (56) R10: 56 sc (56)
R11: (13 sc, sc inc) x 4 (60)
R12-14: 60 sc (60)
R15: (14 sc, sc inc) x 4 (64)
R16-18: 64 s (64)
R19: (15 sc, sc inc) x 4 (68)
R20-22: 68 sc (68)
R23: Sl st to 1st sc, ch 1 (does not count as a st), 68 hdc (68)
Fasten off and weave in ends.
Cut a piece of cardboard to the size of the bottom, and insert it into the pot. Add weight to the bottom.
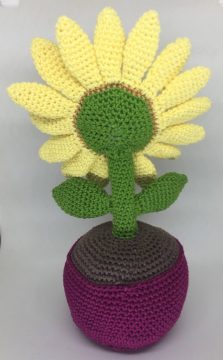
Dirt & Stem
Stuff as you go.
R1: Join brown yarn to 3rd loop of 1st hdc in R23 of the pot. 68 sc in 3rd loops (68)
R2: (15 sc, sc dec) x 4 (64)
R3: (6 sc, sc dec) x 8 (56)
R4: (5 sc, sc dec) x 8 (48)
R5: (6 sc, sc dec) x 6 (42)
R6: (5 sc, sc dec) x 6 (36)
R7: (4 sc, sc dec) x 6 (30)
R8: (3 sc, sc dec) x 6 (24)
R9: (2 sc, sc dec) x 6 (18) R10: (1 sc, sc dec) x 6 (12) Change color to green on the last st of this round.
Insert your stem support into the pot. I used a foam hair roller with a chopstick inserted into the center for mine.
R11-29: Crocheting around the stem support – 12 sc (12). If you want a longer stem, keep going until you are it’s long enough for your liking.
R30-31: 5 sc, ch 1, turn (5)
R32: 5 sc (5)
Fasten off, leaving long tail for sewing.
Sew to the back bottom of the flower, directly behind the petals.
Leaves
(Make 2 – in green)
R1: 4 sc in magic ring (4)
R2: (1 sc, sc inc) x 2 (6) R3: (1 sc, sc inc) x 3 (9) R4: (2 sc, sc inc) x 3 (12) R5: (1 sc, sc inc) x 6 (18) R6-10: 18 sc (18) R11: (4 sc, sc dec) x 3 (15) R12: 15 sc (15) R13: (3 sc, sc dec) x 3 (12) R14: 12 sc (12) R15: (1 sc, sc dec) x 4 (8) R16: Do not stuff – flatten the leaf and 4 sc across both sides of the top of the to close
Fasten off, leaving long tail for sewing. Sew to either side of the stem.
You’re done!
I hope you have enjoyed making your flower as much as I enjoyed designing it.
No unauthorized reproduction or distribution of this pattern or content, in whole or in part, is permitted. You are free to sell anything made with this pattern, but please give credit when doing so. A link back to the pattern page is appreciated.
Any additional questions regarding the use of the pattern publication please send an email to neogurumi@gmail.com