
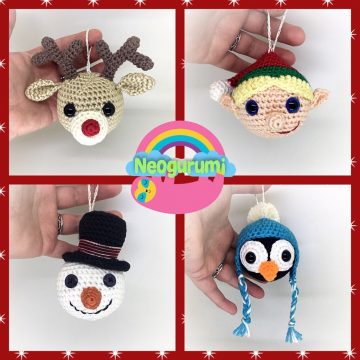
Holiday Ornaments CAL going on in the facebook group Your Crochet Oasis starting Monday, December 3rd, 2018. Join the group by clicking here and crochet along with us!
**A printable PDF version of this pattern is available here.**
Materials needed:
Worsted weight yarn –
– Tan, brown, ivory & red for reindeer,
– White sparkle, black & orange for snowman
– Skin tone, red, green & white for elf
– Black, white, turquoise & ivory for penguin.
Suggested yarn: Caron Simply Soft
Suggested hook size: 3.25mm (D)
Other Materials Needed:
2 x 12mm safety eyes for each ornament OR small buttons (used on my snowman) Black & red embroidery floss for snowman & elf Thread or embroidery floss for hanger.
Yarn needle
Poly-fil
Size: Each ball is approximately 2.5” when made with the suggested yarn and hook size (not including additional features).
Stitch abbreviations
Ch: chain
MR: magic ring
Slst: slip stitch
St(s): stitch(es)
Sc: single crochet
Hdc: half double crochet
Inc: increase
Dec: decrease
(): repeat same stitches
FLO: crochet in front loop only
BLO: crochet in back loop only
Sk: skip
FO: fasten off
Pattern is worked in continuous rounds unless noted otherwise.
**To make the loop for your ornaments, use crochet thread or embroidery floss & a 1.5mm hook. Ch 30, and sew to the top of the ornament. Make the chain longer or shorter as needed.**
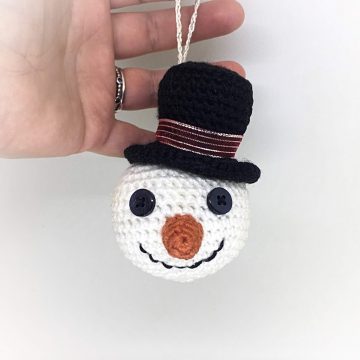
Snowman
Ornament Base
Make 1 – in white sparkle
Stuff as you go.
R1: sc x 6 in MR (6)
R2: sc inc x 6 (12)
R3: (1 sc, sc inc) x 6 (18)
R4: (2 sc, sc inc) x 6 (24)
R5: (3 sc, sc inc) x 6 (30)
R6: (4 sc, sc inc) x 6 (36)
R7: (5 sc, sc inc) x 6 (42)
R8-14: 42 sc (42)
R15: (5 sc, sc dec) x 6 (36)
R16: (4 sc, sc dec) x 6 (30)
R17: (3 sc, sc dec) x 6 (24)
If using safety eyes, insert between R11 & 12, 6 sts apart.
R18: (2 sc, sc dec) x 6 (18)
R19: (1 sc, sc dec) x 6 (12)
R20: sc dec x 6 (6)
FO, leaving a long tail for sewing. Whip stitch FLO & pull tight to close. Hide ends.
Nose
Make 1 – in orange
R1: 4 sc in MR (4)
R2: (1 sc, sc inc) x 2 (6)
R3: 6 sc (6)
R4: (2 sc, sc inc) x 2 (8)
R5: 8 sc (8)
FO, leaving a long tail for sewing.
Hat
Make 1 – in black
R1: 7 sc in MR (7)
R2: sc inc x 7 (14)
R3: (1 sc, sc inc) x 7 (21)
R4: (2 sc, sc inc) x 7 (28)
R5: 28 sc BLO (28)
R6-7: 28 sc (28)
R8: (12 sc, sc dec) x 2 (26)
R9-10: 26 sc (26)
R11: (11 sc, sc dec) x 2 (24)
R12: 24 sc (24)
R13: In FLO, (3 sc, sc inc) x 6 (30)
R14: (4 sc, sc inc) x 6 (36)
R15: (5 sc, sc inc) x 6 (42)
R16: (6 sc, sc inc) x 6 (48)
FO, leaving a long tail for sewing.
Finishing
– Sew buttons for eyes if you are not using safety eyes.
– Stuff and sew the nose on 1 round under the eyes.
– Sew the hat on to the ornament.
– Add a ribbon embellishment to the hat if desired.
– Embroider a mouth onto your snowman.
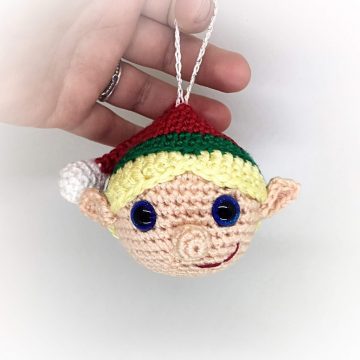
Elf
Ornament Base
Make 1 – in skin tone
Stuff as you go.
R1: sc x 6 in MR (6)
R2: sc inc x 6 (12)
R3: (1 sc, sc inc) x 6 (18)
R4: (2 sc, sc inc) x 6 (24)
R5: (3 sc, sc inc) x 6 (30)
R6: (4 sc, sc inc) x 6 (36)
R7: (5 sc, sc inc) x 6 (42)
R8-14: 42 sc (42)
R15: (5 sc, sc dec) x 6 (36)
R16: (4 sc, sc dec) x 6 (30)
R17: (3 sc, sc dec) x 6 (24)
If using safety eyes, insert between R11 & 12, 6 sts apart.
R18: (2 sc, sc dec) x 6 (18)
R19: (1 sc, sc dec) x 6 (12)
R20: sc dec x 6 (6)
FO, leaving a long tail for sewing. Whip stitch FLO & pull tight to close. Hide ends.
Nose
Make 1 – in orange
R1: 6 sc in MR (6)
R2: (1 sc, sc inc) x 3 (9)
R3: (1 sc, sc dec) x 3 (6)
FO, leaving a long tail for sewing.
Hat and Hair
Make 1 – starting in white
R1: 6 sc in MR (6)
R2: sc inc x 6 (12)
R3-5: 12 sc (12)
R6: sc dec x 6 (6) Change to red on the last st of this round.
R7-8: 6 sc (6)
R9: (1 sc, sc inc) x 3 (9)
R10: 9 sc (9)
R11: (2 sc, sc inc) x 3 (12)
R12: 12 sc (12)
R13: (3 sc, sc inc) x 3 (15)
R14: 15 sc (15)
R15: (4 sc, sc inc) x 3 (18)
R16: 18 sc (18)
R17: (2 sc, sc inc) x 6 (24)
R18: 24 sc (24)
R19: (3 sc, sc inc) x 6 (30)
R20: 30 sc (30)
R21: (4 sc, sc inc) x 6 (36)
R22: 36 sc (36)
R23: (5 sc, sc inc) x 6 (42)
R24-26: 42 sc (42) Change to green on the last st of this R26
R27-29:42 sc (42) Change to yellow on the last st of R29
R30: Sl st x 1, ch 1, hdc in same st, 11 hdc, 1 dc, 6 tr, 1 dc, 1 sc, 1 dc, 6 tr, 1 dc, 13 hdc, sl st join to 1sthdc
(42)
FO, leaving a long tail for sewing.
Ears
Make 2 – in skin tone
R1: Ch 6, sc in 2nd ch from hook, 1 hdc, dc inc x 1, 1 hdc, [sc x 3] in last ch, 1 hdc, dc inc x 1, 1 hdc, 1 sc, sl st join to 1st sc (13)
FO, leaving a long tail for sewing.
Finishing
– Sew buttons for eyes if you are not using safety eyes.
– Stuff and sew the nose on directly under the eyes.
– Sew the hat/hair on to the ornament.
– Sew on the ears on either side of the head, starting right under the hairline.
– Embroider a mouth onto your elf.
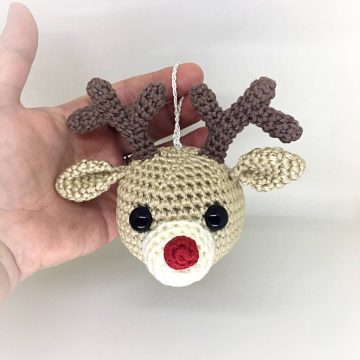
Reindeer
Ornament Base
Make 1 – in tan
Stuff as you go.
R1: sc x 6 in MR (6)
R2: sc inc x 6 (12)
R3: (1 sc, sc inc) x 6 (18)
R4: (2 sc, sc inc) x 6 (24)
R5: (3 sc, sc inc) x 6 (30)
R6: (4 sc, sc inc) x 6 (36)
R7: (5 sc, sc inc) x 6 (42)
R8-14: 42 sc (42)
R15: (5 sc, sc dec) x 6 (36)
R16: (4 sc, sc dec) x 6 (30)
R17: (3 sc, sc dec) x 6 (24)
If using safety eyes, insert between R11 & 12, 6 sts apart.
R18: (2 sc, sc dec) x 6 (18)
R19: (1 sc, sc dec) x 6 (12)
R20: sc dec x 6 (6)
FO, leaving a long tail for sewing. Whip stitch FLO & pull tight to close. Hide ends.
Muzzle
Make 1 – in ivory
R1: 6 sc in MR (6)
R2: sc inc x 6 (12)
R3: (1 sc, sc inc) x 6 (18)
R4-5: 18 sc (18)
FO, leaving a long tail for sewing.
Nose
Make 1 – in red
R1: 4 sc in MR (4)
R2: sc inc x 4 (8)
R3: (2 sc, sc dec) x 2 (6)
FO, leaving a long tail for sewing.
Ears
Make 2 – in tan
R1: 4 sc in MR (4)
R2: (1 sc, sc inc) x 2 (6)
R3: (1 sc, sc inc) x 3 (9)
R4: (2 sc, sc inc) x 3 (12)
R5-6: 12 sc (12)
R7: (1 sc, sc dec) x 4 (8)
R8: Do not stuff, pinch closed and sc x 4 across the ear. (4)
R9: Fold in half and sc x 2 across. (2) FO, leaving a long tail for sewing.
R8: Do not stuff, pinch closed and sc x 4 across the ear. (4)
R9: Fold in half and sc x 2 across. (2) FO, leaving a long tail for sewing.
Long antlers
Make 2 – in brown
R1: 6 sc in MR (6)
R2-11: 6 sc (6)
FO, leaving a long tail for sewing.
Short antlers
Make 4 – in brown
R1: 6 sc in MR (6)
R2-5: 6 sc (6)
FO, leaving a long tail for sewing.
Finishing
– Sew buttons for eyes if you are not using safety eyes.
– Stuff and sew the muzzle on directly under the eyes.
– Stuff and sew the nose onto the muzzle.
– Sew the ears onto the sides of the head, 2 rounds above the eyes.
– Sew the antler pieces together, 2 short to each long.
– Sew the antlers to the ornament.
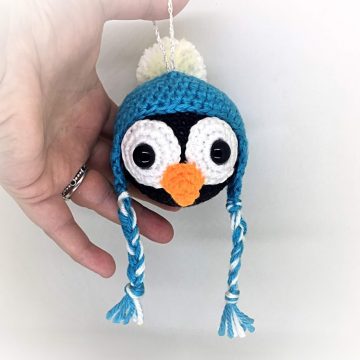
Penguin
Eye patches
Make 2 – in white
R1: 7 sc in MR (7)
Don’t pull too tightly closed, leave a space in the middle to insert safety eyes (if you are using them).
R2: sc inc x 7 (14)
R3: (1 sc, sc inc) x 7 (21)
FO, leaving a long tail for sewing.
Ornament Base
Make 1 – in black
Stuff as you go.
R1: sc x 6 in MR (6)
R2: sc inc x 6 (12)
R3: (1 sc, sc inc) x 6 (18)
R4: (2 sc, sc inc) x 6 (24)
R5: (3 sc, sc inc) x 6 (30)
R6: (4 sc, sc inc) x 6 (36)
R7: (5 sc, sc inc) x 6 (42)
R8-14: 42 sc (42)
R15: (5 sc, sc dec) x 6 (36)
R16: (4 sc, sc dec) x 6 (30)
R17: (3 sc, sc dec) x 6 (24)
*Insert safety eyes into the center of the eye patches and then between R11-12, 6 sts apart. R18: (2 sc, sc dec) x 6 (18)
R19: (1 sc, sc dec) x 6 (12)
R20: sc dec x 6 (6)
FO, leaving a long tail for sewing. Whip stitch FLO & pull tight to close. Hide ends.
Beak
Make 1 – in orange
R1: 6 sc in MR (6)
R2: 6 sc (6)
R3: (1 sc, sc inc) x 3 (9)
R4: 9 sc (9)
FO, leaving a long tail for sewing.
**Note – all starting chs and turning chs in the next parts do not count as a stitch.**
Hat
Make 1 – in turquoise
R1: Ch 1, 8 hdc in MR, sl st join to 1st hdc (8)
R2: Ch 1, hdc inc x 8, join to 1sthdc (16)
R3: Ch 1, (1 hdc, hdc inc) x 8, join to 1st hdc (24)
R4: Ch 1, (2 hdc, hdc inc) x 8, join to 1st hdc (32)
R5: Ch 1, (3 hdc, hdc inc) x 8, join to 1sthdc (40)
R6-9: Ch 1, 40 hdc, join to 1st hdc (40)
FO, leaving a long tail for sewing.
Ear flaps
Make 2 – in turquoise
R1: Join yarn to any st on the hat, ch 1, 8 hdc, ch 1, turn (8)
R2: hdc dec x 1, 4 hdc, hdc dec x 1, ch 1, turn (6)
R3: hdc dec x 1, 2 hdc, hdc dec x 1, ch 1, turn (4)
R4: hdc dec x 2, ch 1, turn (2)
R5: hdc dec x 1 (1)
FO & weave in ends.
Count over 14 sts from the 1st ear flap, join to 15th st and start the 2nd ear flap. Repeat R1-5. FO & weave in ends.
Finishing
– Sew buttons for eyes if you are not using safety eyes.
– Stuff and sew the beak on directly under the eyes.
– Add braids and a pom pom to the hat (optional).
– Sew the hat onto the ornament.
You’re done!
I hope you have enjoyed making your ornaments as much as I enjoyed designing them. Please feel free to contact me if you need any assistance with this pattern.
The photographs and pattern contained in this document are property of © Jessica Doering & © Neogurumi.
No unauthorized reproduction or distribution of this pattern or content, in whole or in part, is permitted. You are free to sell any finished products made with this pattern, but please give credit when doing so. A link back to the pattern page is appreciated.
Any additional questions regarding the use of the pattern publication please send an email to neogurumi@gmail.com
Copyright 2018, Jessica Doering, Neogurumi


