Hello dear Amigurumi Followers
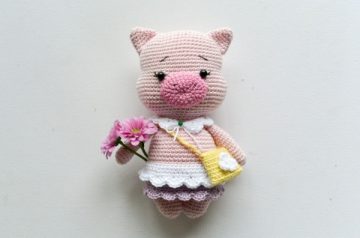
Today we share Amigurumi Amigurumi Emma the Pig Free Pattern for you. As you know we share new free amigurumi pattern every day. The main crochets are gazelle, amigurumi bear, pola, crochet panda, penguin, giraffe, llama, pig, bunny, clown, lamb, bee, crochet unicorn, amigurumi doll, fox, penguin, dinosaur, crochet elephant, hippo, monkey, crochet cat, crochet dog and more …
Todays daily new amigurumi free crochet pattern is Amigurumi Amigurumi Emma the Pig.
I want to give you some informations about this amigurumi free pattern ; Amigurumi Emma the Pig.
Materials and Tools
– Yarn: 1 or more colors.
I used Catania “Original” in light pink, pink, white, purple.
Change of colors are only suggestions, you can choose your own color patterns.
– Crochet hook in accordance with the yarn you use.
I used a 2.00mm hook.
– Stuffing: I use polyester wool and a chopstick to stuff the doll.
– Tapestry needle, scissors.
– Safety eyes 7.00 mm.
– Stitch marker.
I used thin black thread.
– Black embroidery thread for the nose.
Abbreviations
mr = Magic ring
ch = Chain
dc = Double crochet
st = Stitch
slst = Slip stitch
sc = Single crochet
() = Parentheses are used for repeated patterns of stitches, example: (2 sc, inc) x3 means repeat 3 times (2 single crochet and one increase).
inc = 2 sc in the same stitch
dec = 2 sc together, but working in the front loops only
Amigurumi Emma the Pig Free Pattern
HEAD
Use the 2.00 mm hook.
1- 11 crochet chains (11)
2- inc on the 2nd ch from the hook, 8 sc, 3 sc on the last chain, turn and work on the other side of the foundation chs, 9 sc (22)
3- 2 inc, 8 sc, 3 inc, 8 sc, 1 inc, (fig 1) (28)
4- (1 sc, 1 inc) x2, 8 sc, (1 sc, 1 inc) x3, 9 sc, 1 inc (34)
5- (2 sc, 1 inc) x2, 8 sc, (2 sc, 1 inc) x3, 10 sc, 1 inc (40)
6- (3 sc, 1 inc) x2, 8 sc, (3 sc, 1 inc) x3, 11 sc, 1 inc (46)
7- (4 sc, 1 inc) x2, 8 sc, (4 sc, 1 inc) x3, 12 sc, 1 inc, (fig 2) (52)
8- 52 sc around (52)
9- 3 sc, 1 inc, 25 sc, 1 inc, 22 sc (54)
10- 54 sc around (54)
11- 4 sc, 1 inc, 26 sc, 1 inc, 22 sc (56)
12 – 14- 56 sc around, (fig 3) (56)
15- 3 sc, 2 dec, 24 sc, 2 dec, 21 sc (52)
16- 3 sc, 3 inc, 23 sc, 3 inc, 20 sc (58)
17- 58 sc around (58)

● Note:
I use invisible decrease which is worked in the front loops only. Please see the photo tutorial I made for it at the last part of the pattern.
Attach the eyes to the head between rounds 17 and 18 with 10 stitches apart (fig 5).
● Note: to attach the eyes in the center of the head, skip 16 stitches from beginning, then attach the first eye, skip next 10 stitches and attach the second eye.

18- 3 sc, (1 sc, 1 inc) x3, 23 sc, (1 sc, 1 inc) x3, 20 sc (64)
19 – 21- 64 sc around, (fig 4) (64)
22- 7 sc, 1dec, 30 sc, 1 dec, 23 sc (62)
23- 62 sc around (62)
24- 7 sc, 1 dec, 29 sc, 1 dec, 22 sc (60)
25- 60 sc around (60)
26- 1 sc, (1 dec, 4 sc) x3, 12 sc, (1 dec, 4 sc) x3, 11 sc (54)
27- 1 sc, (1 dec, 3 sc) x3, 12 sc, (1 dec, 3 sc) x3, 11 sc (48)
28- 1 sc, (1 dec, 2 sc) x3, 12 sc, (1 dec, 2 sc) x3, 11 sc (42)
29- 1 sc, (1 dec, 1 sc) x3, 12 sc, (1 dec, 1 sc) x3, 11 sc (36)
30- 1 sc, 3 dec, 12 sc, 3 dec, 11 sc (30)
31- 3 dec, 9 sc, 3 dec, 9 sc (24)
Stuff the head firmly (fig 6, 7 and 8).
● Note:
Add extra stuffing at the bottom part of the head to get full and round cheeks.

Don’t cut the yarn, we continue to make body:
BODY
32- 24 sc around (24)
33- 3 inc, 9 sc, 3 inc, 9 sc (30)
34- 30 sc around (30)
35- (1 sc, 1 inc) x3, 9 sc, (1 sc, 1 inc) x3, 9 sc (36)
36- 36 sc around (36)
37- (2 sc, 1 inc) x3, 9 sc, (2 sc, 1 inc) x3, 9 sc (42)
38- 42 sc around (42)
39- 7 sc, 1 inc, 20 sc, 1 inc, 13 sc (44)
40- 44 sc around (44)
41- 8 sc, 1 inc, 21 sc, 1 inc, 13 sc, (fig 9) (46)
42- 46 sc around (46)
43- 9 sc, 1 inc, 22 sc, 1 inc, 13 sc (48)
44- 48 sc around (48)
45- Use only back loops: 48 sc around (48)
46- 48 sc around (48)
47- Use only back loops: 48 sc around (48)
48- 9 sc, 1 dec, 22 sc, 1 dec, 13 sc (46)
49- 46 sc around (46)
50- 9 sc, 1 dec, 21 sc, 1 dec, 12 sc (44)
51- 44 sc around (44)
52- 9 sc, 1 dec, 20 sc, 1 dec, 11 sc, (fig 10) (42)

Stuff the body firmly.
Crochet 1 sc more and put your marker here. It will be the new beginning.
Don’t cut the yarn yet as we are going to make the legs. Mark the beginning of the round for left leg (fig 11).
LEGS
First, make the left leg: crochet 18 sc (round 53). Leave 26 stitches for right leg. Insert your hook in the very first stitch of left leg for the next round (round 54) (fig 12).
Continue with the pattern. Stuff as you go.

53- 18 sc around (18)
54- 7 sc, 2 dec, 6 sc, 3 sc in next stitch (18)
55- 18 sc around (18)
56- 7 sc, 2 dec, 6 sc, 3 sc in next stitch (18)
57- 18 sc around (18)
58- (1 sc, 1 dec) x6 (12)
59- (1 dec) x6 (6)

How to close the end of the round: with a darning needle, insert the remaining yarn through all the front loops of the stitches on the last round (fig 14). Pull all the loops together at once and sew to hide the yarn inside the part you are working on (fig 15).
Right leg:
Lay the doll facing in front of you.
Leave a long tail of yarn to close the gap between legs later.
From the right leg’s first round, count 3 stitches away on both sides then insert your hook across both stitches (fig 16) and make a slip stitch (fig 17). On that same stitch crochet the first sc of right leg, then continue the pattern (fig 18).

Close the gap between legs.

EARS
1- 6 sc in magic ring (6)
2- (1 sc, 1 inc) x3 (9)
3- 9 sc around (9)
4- (2 sc, 1 inc) x3 (12)
5- 12 sc around (12)
6- (1 sc, 1 inc) x6 (18)
7- 18 sc around (18)
Cut the yarn leaving a tail for sewing.
MUZZLE
1- 6 sc in magic ring (6)
2- (1 inc) x6 (12)
3- (3 sc, 3 inc) x2 (18)
4- 3 sc, (1 sc, 1 inc) x3, 3 sc, (1 sc, 1 inc) x3 (24)
5- 7 sc, 3 inc, 9 sc, 3 inc, 2 sc (30)
6-7- 30 sc around (30)
Cut the yarn leaving a long the tail for sewing.

How to Invisible Fasten off:
Using a needle, insert it in both loops of the second stitch after the last stitch (fig 21). Then, insert it only in the back loop of the last stitch (fig 22). Secure the yarn and use the remaining yarn tail for sewing.
● Note:
Stuff the muzzle lightly while sewing it onto the head later. The wrong side of the muzzle should be facing out.
Another suggestion for the muzzle: round 5 – 7 sc, 3 inc, 9 sc, 3 inc, 2 sc BLO, round 6-7 – 30 sc around (turn right side out).
ARMS
1- 6 sc in magic ring (6)
2- (1 inc) x6 (12)
3-6- 12 sc around (12)
7- (4 sc, 1 dec) x2 (10)
8-15- 10 sc around (10)
16- (3 sc, 1 dec) x2 (8)
Stuff the arms lightly, and then close it with 3 sc across both sides. Cut the yarn leaving a tail.
SKIRT
UNDERSKIRT:
Lay your piggy facing away from you. Work with the back loops of round 47. Insert your hook to first loop and pick up the yarn (fig 24, 25). Make a sl st in each loop (round 1) (fig 26). Follow the pattern below to crochet farther.

1- Make a slip stich in each loop, join with first stitch (48)
2- 48 sc BLO, join at the end of round (48)
3- 6 sc, ( 1 inc, 11 sc) x3, 1 inc, 5 sc, join at the end of round,(fig 27)(52)
4- 52 sc, join at the end of round (52)
5- 1 sc, ( 1 inc, 12 sc) x3, 1 inc, 11 sc, join at the end of round (56)
6- 56 sc, join at the end of round, (fig 28) (56)
7- Make the shells
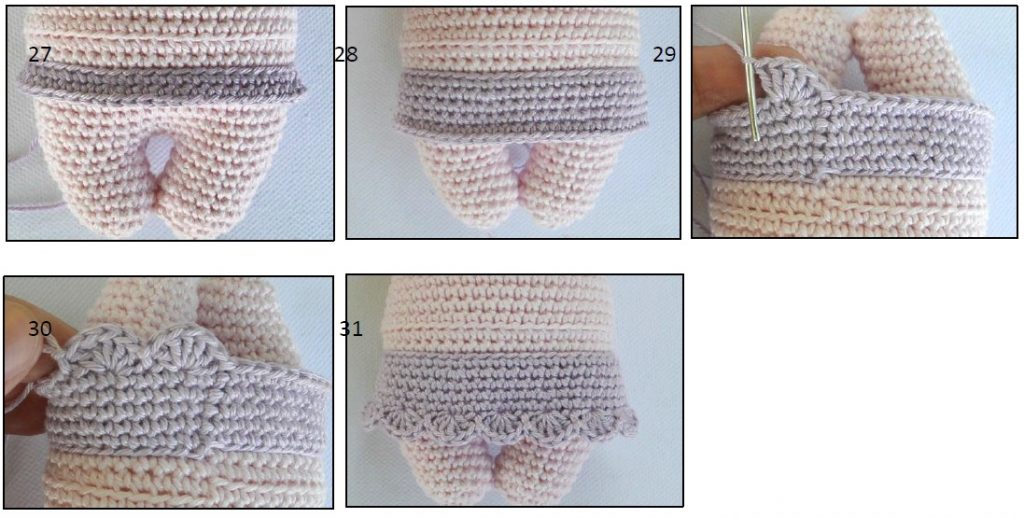
Making the shells:
– Start with a sl st, skip the next st, make 5 dc into the next st (fig 29), skip the next st, sl st to the next st. Repeat the process for 13 times more (fig 30).
– You should have 14 shells in total (31).
OVERSKIRT:
In the same way, attach the white yarn. Make a slip stitch in each loop of round 45. Follow the pattern:

COLLAR
Crochet 32 chains. Turn your crocheting and work on the other side: make 1 starting chain and 32 sc (fig 35). At last, make 8 shells.
Use the tail of the yarn to tie and connect the ends of the collar.

ASSEMBLING:
Place the muzzle between the eyes and make the oval form. Stuff it lightly and fix it with pins. Sew it to head across the stitch of muzzle and next stitch of head (fig 37, 38).

Sew the ears on each side, see photos for placement.

Sew the arms on either side of the body, just below the head.
Embroider the eyebrows and eyelashes and nose.

BAG:
1- Crochet 11 chains (11)
2- inc on the 2nd ch from the hook, 8 sc, 3 sc on the last chain, turn and work on the other side of the foundation chs, 9 sc, (fig 43) (22)
3-8- Use only back loops: 22 sc around, (fig 44) (22)
9- Crochet 1 sc more to be on the corner, then 1 slip stitch in each back loop.
Then make a 1 sl st to be on the corner again, crochet 45 chains (string of bad), skip 10 stitches and insert your hook in the 11th stitch and connect the string to other side of bag with the sl st (fig 45). (22)


