
Hello dear Amigurumi Followers
Today we share Amigurumi Cute Bat Free Pattern for you. As you know we share new free amigurumi pattern every day. The main crochets are gazelle, amigurumi bear, pola, crochet panda, penguin, giraffe, llama, pig, bunny, clown, lamb, bee, crochet unicorn, amigurumi doll, fox, penguin, dinosaur, crochet elephant, hippo, monkey, crochet cat, crochet dog and more …
Todays daily new amigurumi free crochet pattern is Amigurumi Cute Bat.
I want to give you some informations about this amigurumi free pattern ; Cute Bat.

Material
- 3mm crochet hook
- DK yarn in color of choice
- Tiny bit of yarn/thread in black and white for the embroidery
- 8mm safety eyes
If making a baby bat:
- 2mm crochet hook
- 4ply/baby yarn in color of choice
- Tiny bit of yarn/thread in black and white for the embroidery
- 6mm safety eyes
Abbreviations (US)
- MC: magic circle
- 2-sc inc: 2 sc in next st (increase by 1)
- 3-sc inc: 3 sc in next st (increase by 2)
- sc2tog: 2 sc together (decrease by 1)
- sc3tog: 3 sc together (decrease by 2)
- sl st: Slip stitch
- ch: Chain
Instructions
This pattern is made in a spiral of continuous rounds
Amigurumi Cute Bat Free Pattern
Ears (make 2)
| Row # | Instructions | Sts |
| R1 | 5-sc MC | 5 |
| R2 | 2-sc inc, sc, 2-sc inc, sc, 2-sc inc | 8 |
| R3 | [sc, 2-sc inc] × 4 | 12 |
| R4 | [sc × 2, 2-sc inc] × 4 | 16 |
| R5 | [sc × 3, 2-sc inc] × 4 | 20 |
| R6 | [sc × 3, sc2tog] × 4 | 16 |
| R7 | [sc × 2, sc2tog] × 4 | 12 |
Finish off, sew the ends together to close the gap.

Finish off. Leave long tail. Don’t stuff.

Sew the end of the each ear together to close it off flat as shown in the picture below, don’t cut the remaining yarn tail. You’ll need it to sew the ear to the body:

Wings (Make 2)
| Row # | Instructions |
| R1 | Ch 12, turn |
| R2 | sl st, sc × 4, sc2tog, sl st × 4, ch, turn |
| R3 | 2-sc inc, sc × 8, ch, turn |
| R4 | sc × 3, sc2tog, sc × 5, ch, turn |
| R5 | sc × 3 sc2tog , sc × 4, ch, turn |
| R6 | sl st × 5, ch × 2, sl st |

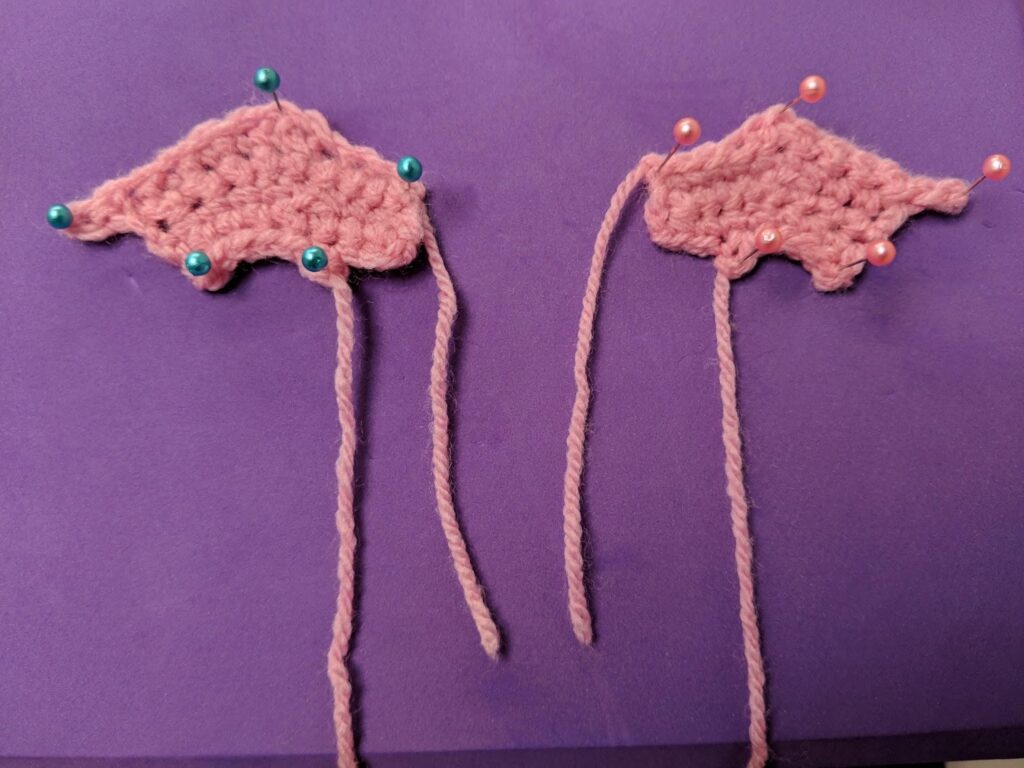
The wings will probably curl on itself. To make it stay flat you will need to “Block” it. You do it by thoroughly wetting the wings with water, gently squeezing the excess (do not wring or twist), then pin each wing to a flat surface as indicated in the picture below until it drys. I used a yoga foam block but you can use any other surface that can be pinned. As you pin the wings, stretch them slightly to the shape you want as it helps them keep shape.
Assembly

Using a sewing needle:

- Using the remaining yarn tail, sew the ears to the top of the head. Attach one end of each ear on R4 and the other on R7.

- The yarn tail for the wings need to be sewn into the wing a bit so that the tail pops out of area highlighted with a circle below. Don’t sew it tight as you want the wing nub to remain visible for a bat wing shape.

- Sew the wing into the body using the yarn tail that remains from the step above. Attach one end to R14 and the other to R10. Repeat for the other wing.
More Amigurumi Bat Ideas:


