
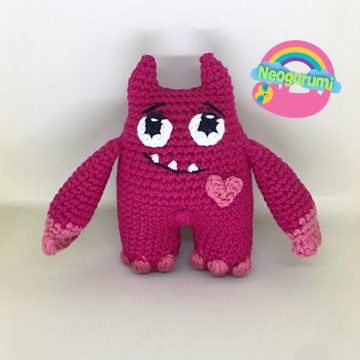
Love Monster! Perfect Valentine’s gift for your little monsters <3
You can purchase a downloadable pdf version of this pattern HERE.
Ravelry store: http://www.ravelry.com/designers/jessica–doering
Etsy store: https://www.etsy.com/shop/Neogurumi
Facebook page: http://www.facebook.com/neogurumi
Materials needed:
Worsted weight yarn – 100 yards dark pink (MC), 20 yards pink, scrap amounts of black & white
Suggested yarn: Hobby Lobby I Love this Cotton in Rose Bud, Rosey II, Black & White
Suggested hook size: 3.25mm (D)
Other Materials Needed:
Black & White embroidery floss
Yarn needle
Poly-fil
Size: 6” tall when made with the suggested yarn and hook size.
Stitch abbreviations
Ch: chain
MR: magic ring
Slst: slip stitch
St(s): stitch(es)
Sc: single crochet
Inc: increase
Dec: decrease
BOB5: 5 dc bobble
(): repeat same stitches
FLO: crochet in front loop only
FO: fasten off
Special stitches used
5 dc bobble stitch (BOB5):
Step 1: Yarn over, insert hook into st, yarn over again & pull up loop, yarn over, draw back through 2 loops.
(2 loops)
Step 2: Yarn over, insert hook into same st, yarn over again & pull up loop, yarn over, draw through 2 loops
(3 loops)
Step 3: Yarn over, insert hook into same st, yarn over again & pull up loop, yarn over, draw through 2 loops
(4 loops)
Step 4: Yarn over, insert hook into same st, yarn over again & pull up loop, yarn over, draw through 2 loops
(5 loops)
Step 5: Yarn over, insert hook into same st, yarn over again & pull up loop, yarn over, draw through 2 loops
(6 loops)
Step 6: Yarn over, draw yarn through all 6 loops on hook.
Pattern is worked in continuous rounds unless noted otherwise.
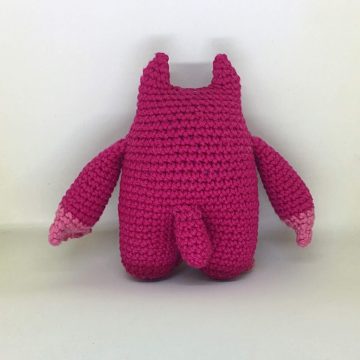
Arms
Make 2 – starting in dark pink.
R1: Ch 8, join with a slst to form a circle (8)
R2-3: Sc x 8 (8)
R4: (Sc x 3, sc inc x 1) x 2 (10)
R4: (Sc x 3, sc inc x 1) x 2 (10)
R5-6: Sc x 10 (10)
R7: (Sc x 4, sc inc x 1) x 2 (12)
R8-9: Sc x 12 (12)
R7: (Sc x 4, sc inc x 1) x 2 (12)
R8-9: Sc x 12 (12)
R11: Sc x 14 (14)
R12: (Sc x 6, sc inc x 1) x 2 (16)
R12: (Sc x 6, sc inc x 1) x 2 (16)
R13: Sc x 16 (16)
R14: (Sc x 7, sc inc x 1) x 2 (18) Change to pink.
R15-17: Sc x 18 (18)
R18: Stuff arms leaving the top of the arm unstuffed, then working across both sides: sc x 1, (BOB5 x 1, sc x 1) x 4, slst same st (9)
R18: Stuff arms leaving the top of the arm unstuffed, then working across both sides: sc x 1, (BOB5 x 1, sc x 1) x 4, slst same st (9)
FO & weave in ends.
Legs
Make 2 – starting in dark pink.
R1: Sc x 7 in MR (7)
R2: Sc inc x 7 (14)
R2: Sc inc x 7 (14)
R3: (Sc x 1, sc inc x 1) x 7 (21)
R5-8: Sc x 21 (21)
FO the 1stleg but not the 2nd. Continue to the body.
Body & Head
Make 1 – in dark pink. Continue from the 2nd leg.
R1: Sc x 6 (or until you reach the inside center st with the feet facing away from you), ch 1, sc x 21 around the 1st leg, sc x 1 in ch 1, continue sc x 15 around the starting leg. (43)
R2: Sc x 6, sc in the other side of the ch 1, sc x 16, (sc inc x 1, sc x 3) x 3, sc inc x 1, sc x 9 (48)
R3-5: Sc x 48 (48)
R6: Sc x 17, sc dec x 1, sc x 12, BOB5 (belly button – make sure it is centered, adjust if needed), sc x 12, sc dec x 1, sc x 2 (46)
R7-8: Sc x 46 (46)
R9: Sc x 17, sc dec x 1, sc x 23, sc dec x 1, sc x 2 (44)
R9: Sc x 17, sc dec x 1, sc x 23, sc dec x 1, sc x 2 (44)
R10: Sc x 44 (44)
R11: Sc x 22, (sc dec x 1, sc x 3) x 3, sc dec x 1, sc x 5 (40)
R12: Sc x 40 (40)
R13: Join arms: sc x 18, insert hook into both sides of the top of the arm and then into the next st on the body & sc together, repeat 3 more times in the next 3 sts on the top of the arm and the body, sc x 14, repeat sc x 4 crocheting the 2nd arm to the body. (40)
R12: Sc x 40 (40)
R13: Join arms: sc x 18, insert hook into both sides of the top of the arm and then into the next st on the body & sc together, repeat 3 more times in the next 3 sts on the top of the arm and the body, sc x 14, repeat sc x 4 crocheting the 2nd arm to the body. (40)
R14: Sc x 4, sc dec x 1, sc x 6, sc dec x 1, sc x 26, (38)
R16: Sc x 36 (36)
R17: (Sc x 7, sc dec x 1) x 4 (32)
R18-21: Sc x 32 (32)
R22: Make the 1st ear: sc x 5, skip 23 sts, sc x 4 (9)
R23: Sc x 9 (9)
R24: (Sc x 1, sc dec x 1) x 3 (6)
R25: (Sc x 1, sc dec x 1) x 2 (4)
R24: (Sc x 1, sc dec x 1) x 3 (6)
R25: (Sc x 1, sc dec x 1) x 2 (4)
FO, leaving a tail for sewing. Close up the ear and hide ends.
Make the 2nd ear:
R1: Starting in the back of the head, count over 8 sts from the 1stear. Sc x 9 (9)
R2: Skip the middle sts, continue around the ear sc x 9 (9)
R3: (Sc x 1, sc dec x 1) x 3 (6)
R2: Skip the middle sts, continue around the ear sc x 9 (9)
R3: (Sc x 1, sc dec x 1) x 3 (6)
R4: (Sc x 1, sc dec x 1) x 2 (4)
FO, leaving a tail for sewing. Close up the ear and hide ends.
Stuff the body, head & add some stuffing to the ears also. Once finished, sew across the head in a straight line to close.
Eyes
Make 1 – starting in black.
R1: Sc x 7 in MR (7) Change to white.
FO, leaving a long tail for sewing.
Add a white highlight to each eye then sew to the head.
Tail
Make 1 – in MC
R1: Sc x 6 in MR (6)
R2: (Sc x 1, sc inc x 1) x 3 (9)
R3-6: Sc x 9 (9)
R2: (Sc x 1, sc inc x 1) x 3 (9)
R3-6: Sc x 9 (9)
R7: (Sc x 1, sc dec x 1) x 3 (6)
R8: Stuff tail, leaving the top unstuffed, then working across both sides, sc x 3 (3)
R8: Stuff tail, leaving the top unstuffed, then working across both sides, sc x 3 (3)
FO, leaving a long tail for sewing. Sew to the back of the doll.
Heart applique
Make 2 – in MC
R1: In MR, ch 2, dc x 1, hdc x 1, sc x 1, ch 3, sc x 1, hdc x 1, dc x 1, ch 2, slst x 1.
FO, leaving a long tail for sewing.
Pull the MR closed and then sew to the front of the doll.
You’re done!
I hope you have enjoyed making your monster as much as I enjoyed designing him. Please feel free to contact me if you need any assistance with this pattern.
The photographs and pattern contained in this document are property of
© Jessica Doering & © Neogurumi.
No unauthorized reproduction or distribution of this pattern or content, in whole or in part, is permitted.
You are free to sell any dolls made with this pattern, but please give credit when doing so. A link back to the pattern page is appreciated.
Any additional questions regarding the use of the pattern publication please send an email to neogurumi@gmail.com
Copyright 2019, Jessica Doering, Neogurumi


