Hello dear Amigurumi Followers
Today we share Amigurumi Doll Keychain Free Pattern for you. As you know we share new free amigurumi pattern every day. The main crochets are gazelle, amigurumi bear, pola, crochet panda, penguin, giraffe, llama, pig, bunny, clown, lamb, bee, crochet unicorn, amigurumi doll, fox, penguin, dinosaur, crochet elephant, hippo, monkey, crochet cat, crochet dog and more …
Todays daily new amigurumi free crochet pattern is Amigurumi Doll Keychain.
I want to give you some informations about this amigurumi free pattern ; Doll Keychain.
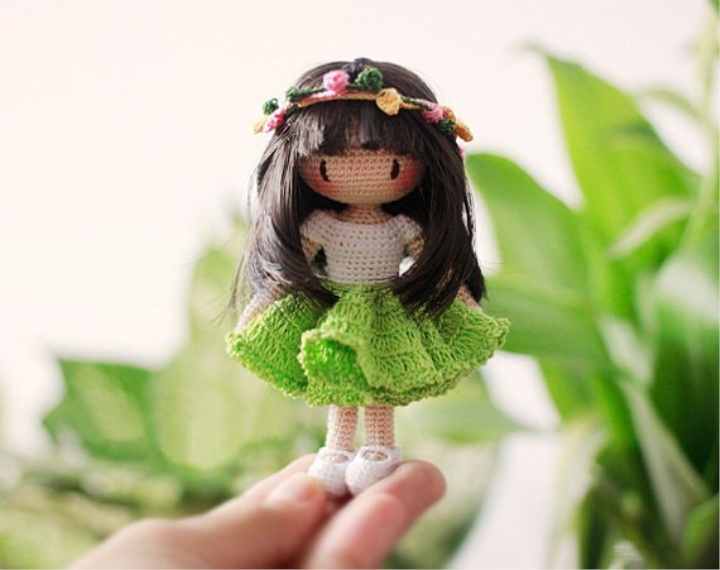
THE BODY AND THE HEAD
OF THE DOLLS A SINGLE ITEM
You can fill the trunk and head both in the course of knitting, and then, when the part is connected.
In the trunk-neck-head in the center we insert the holder (3 cotton-wool sticks with a tape).
I did the whole assembly when the parts were connected.
Amigurumi Doll Keychain Free Pattern
Torso:
1st row: white yarn (panties or panties) to
dial in the ring amigurumi 6 sbn (6)
2nd row: Addition – 6 times (12)
3rd row: Addition – 12 times (24)
4th row: (increase, 3 sc) – 6 times (30)
5-6 series: 30 sb (30).
7 row: we knit with the “walking step” rubbery panties (panties).
We change the thread to the thread of the color of the clothes. We continue knitting in the usual direction.
8 row: decrease, 28 sb (29)
9 row: 9 sb, decrease, 18 sbn (28). When assembling in this row, perform a tightening of the
cape.
10th row: 28 sb (28).
11 row: 18 sb, decrease, 8 sb (27)
12 row: 27 sb for the back wall (27). On the line, which will turn out in this row, we will type the loop of the skirt.
13th row: 27 sbn (27).
14th row: (reduction, 7 sc.) – 3 times (24).
15 series: (decrease, 6 scales) – 3 times (21)
16 row: (decrease, 5 scales) – 3 times (18)
17 row: (decrease, 1 sb) – 6 times. Change the thread to a skin color string.
18 row: Decrease – 6 times (6).
Head:
19 row: 6 sb (6)
20 row: increase – 6 times (12).
21 series: increase – 12 times (24). If the body is stuffed during the mating process, you can insert a holder of cotton buds at this point.
22 series: (increase, 3 sc.) – 6 times (30).
23 series: (increase, 4 sbn) – 6 times (36)
24 series: (increase, 5 sb) – 6 times (42)
25 row: (increase, 6 sc) – 6 times (48)
26 row: (increase , 7 сбн) – 6 times (54)
27 series: (increase, 8 сбн) – 6 times (60)
28-35 series: 60 сбн (60).
36 rows: (9 sb, decrease, 9 sb) – 3 times (57)
37 row: (decrease, 17 sb) – 3 times (54)
38 row: (decrease, 7 scroll) – 6 times (48)
39 row : (3 sb, decrease, 3 sc) – 6 times (42)
40 series: (decrease, 5 scales) – 6 times (36)
41 series: (2 scales, decrease, 2 sc) – 6 times (30)
42 series: (reduction, 3 sc.) – 6 times (24). Fill your head.
43 row: (decrease, 2 sc.) – 6 times (18)
44 row: (decrease, 1 sc.) – 6 times (12)
45 row: decrease – 6 times (6). When the body is stuffed and the neck holder is inserted , the remaining 6 loops are pulled off, the thread is secured and cut. The tip is hidden inside the body.
HANDS (2 pieces) (about 8-9 cm)
Start knitting with a flesh-colored thread.
Type 3 loops in the amigurumi ring (3)
1 row: add to each loop (6)
2 row: 6 sbn (6).
We knit a thumb: 3 in, half-loop in the 2nd and 3rd loops. We return to the beginning of vy-zaniya.
3-18 series: 6 sbn (6).
Fill your hand and pull off the hinges. You can tie the sleeve in the process of knitting the hand by changing the thread of the corresponding color.
HANG-LIGHTS (2 details): ** on photo usual sleeves
In a ring amigurumi type 6 loops.
1 row: additions from csn to each loop (12)
2 ranks: (increase from ssn, 2 cp, 1 ccn) – 6 times (18)
3 ranks: 18 csn (18)
4 ranks: (cf. reduction, 1 sbn) – 6 times (12)
5 ranks: (reduction of sb, 1 sb) – 4 times (8).
At the edge of the sleeve make a harness in any way with another contrasting color.
Sew the sleeves to the top of the handles. You can also start tying the flashlight sleeve in the opposite direction: starting from the last row of the hand in the side of the elbow. Then we pull all the loops and sew the handle to the body.
If you knit a doll dress, which will be worn from above, the sleeves knit, as usual, around the armhole.
In general, the fantasy works.
LEGS (2 parts)
Determine whether the legs in golf, in breeches, pantyhose or bare – choose a thread of the appropriate color.
In our case, the pupa has white breeches. We begin to knit a thread of flesh-colored color.
1 row: we enter 6 loops into the amigurumi ring.
2nd row: (increment in each loop) – (12).
3-5 rows: 12 sb (12)
6 row: (decrease, 2 sb) – 3 times (9)
7-12 row: 9 sbn (9). Change the thread to white.
13- 24: 9 sb. Fit the knife.
25 series: decreases, loops tighten, thread secure and cut off. The tip is hidden inside the legs.
For stability, you can insert a wire (measure along the length of 2x legs + 1.5 cm across the trunk, insert it into the trunk at the attachment point of the legs, turn off at the ends of non-large ovals for the feet, insert into the legs, fill them to the end and tighten the top ). Sewing the legs to the torso will be a threaded attachment – the doll will be able to stand and sit, the legs will freely rotate at the attachment points to the trunk.
FURNITURE (2 pieces)
Type a chain of 8 ct. Knitting continues to the second from the hook loop (7я). After each row, make a connecting post in First loop and start a new row in the first loop. Be sure to mark the beginning of the series with a pin or a marker.
1 row: an increase, 5 sb, 4 sb in one loop. Turn knitting and continue on the other side of the chain: 5 sb, increase (18).
2nd row: (1 sb, increase, 5 sb, increase, 1 sb) – 2 times (22).
3 rd: 22 sb for the rear walls (22).
4 row: 20 sb for the rear walls (20). With 21 loops begin to knit the back of the
shoe:
5 row (start with 21 loops): 2 sb, sbn in the connecting loop 4 rows, 2
sb, 1 in, turn knitting (5).
6 row: 5 sb, 8 in, fix and tear off the thread. From the chain of air loops
we will then form the straps of the shoe.
TROUSER’S MOUSE:
7th row: connecting column in 5th loop, 1 st. Start in the 5th loop: 14 sb, 1 in, knit turn (14).
8th row: 14 sb, turn, without adding Bp (14).
9 row: skip the 1st and 2nd loops, psn in the 3rd loop, (skip 1 pt, psn) – repeat 2 times, psn, (skip 1 pt, psn) – 3 times, cd, rotate without adding bp 7).
10 series: (skip 1 loop, cbn) – 3 times, cb, turn, without adding cp (4).
11th row: skip 3 loops, crochet, chain of 8 th, fix and tear the thread, leaving the tip 10 cm (in case the shoe is wide on the leg, we will pull the shoe with this ni-point).
Collapse the chain of the toe’s toe in half and sew to the top of the shoe.
Cut out the insole from the cardboard or felt, so that the sole is tight.
Insert the leg into the shoe, pass the chain of the back of the shoe into the folded chain of the toe, fasten on the side.
SKIRT (the item is not removable)
We find on the body the 12th row, where the knitting for the back wall was going.
1 row: By the received loop we knit 27 sb.
2 series: increases from ssn into each loop (54).
3rd row (white thread): 54 cbms (54).
4 rows (colored thread): 3 inches of lifting, 53 cms (54).
5 row (white thread): 54 sb (54)
6 row (colored thread): 3 inches of lifting, ssn into the same loop, 5 cns, (increase from
ssn, 5 cms) – repeat to the end of the row.
7 row (white thread): tie the bottom of the skirt with any lace pattern or
“Step by step”. Cut the thread and put it into the product.
ASSEMBLY
1) stuff the body and head.
2) stuffing knobs and legs, attach to the body thread attachment (the limbs will be mobile). On request, before sewing in your hands and feet, insert the wire, passing it through the body and curling the oval in the palms and feet). I did not insert a wire.
EYES:
We divide the head into the left and right halves by a threaded contour. For this, it is convenient to determine the location of the eye and the contour of the hairstyle. To count from the contour 4 items to the left and to the right (distance 8 loops)
– this is the location points eye horizontally.
Vertically there are 3 vertical loops between the eyes. We embroider eyes with two
“strokes” with a black thread. Thick “strokes” look bad.
HAIR:
1 way: sew the tracks from the wig to the head in this order: 1) bangs; 2) the
back part (photo), 3) the side.
2 hair thread: It is better to take a thicker yarn. cut off the thread length of 20-30 cm, folded in half. Fasten them along the contour to each loop as a fringe at the scarf. Weave braids, tails (to your liking).
More Amigurumi Keychain Ideas:
