Hello dear Amigurumi Followers
Today we share Amigurumi Cute Teddy Bear Free Pattern for you. As you know we share new free amigurumi pattern every day. The main crochets are gazelle, amigurumi bear, pola, crochet panda, penguin, giraffe, llama, pig, bunny, clown, lamb, bee, crochet unicorn, amigurumi doll, fox, penguin, dinosaur, crochet elephant, hippo, monkey, crochet cat, crochet dog and more …
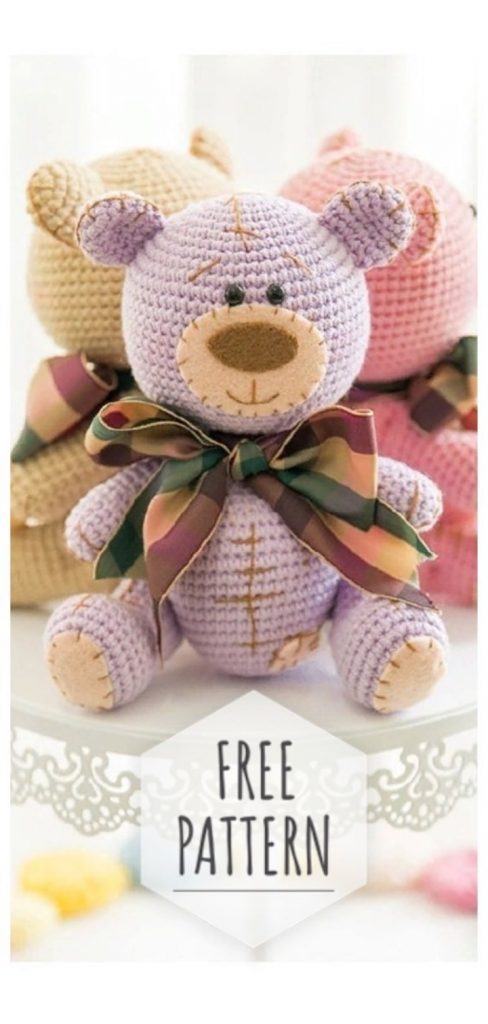
Todays daily new amigurumi free crochet pattern is Amigurumi Cute Teddy Bear.
I want to give you some informations about this amigurumi free pattern ; Cute Teddy Bear.

Materials:
– 2 mm hook (or any other for your yarn)
– yarn: YarnArt Jeans / Alize Cotton Gold, Dolce, Himalaya Dolphin Baby or any other at your discretion
– felt
– floss threads: brown
– filler
– safe eyes 8 – 10 mm
– Gobelin needle
– knitting marker
– scissors
Designations:
KA – amigurumi
vp ring – air loop of the
SBS – a column without a nakida
pr – an increase (two columns in 1 loop)
pr3 – 3 sbn in one loop
ub – a decrease (2 sbn we knit together)
ub3 – a decrease (3 sbn we knit together)
ss – a connecting column
PSN – half column double crochet – double crochet
prSSN – increase from CCH (two CCH in one column)
ass. n. – rear loop
lane. n. – front loop
(…) x – repeat the instruction in brackets
(…) for x times The toy knits in a spiral, unless otherwise indicated.
Amigurumi Cute Teddy Bear Free Pattern
LEGS (2 PCS )
Stuff in the course of knitting.
1 row: type 6 vp Starting from the 2nd ce from hook: 4 sc, (3 sc in one loop), continue to knit on the other side of the chain: 3 sc, pr (12)
2 row: pr, 3 sc, pr * 3, 3 sc, pr * 2 (18)
3 Rd: 1 sc, pr, 3 sc, (1 sc, pr) * 3, 3 sc, (1 sc, pr) * 2 (24)
4 row: (10 sc, pr * 2) * 2 (28)
5 – 8 row: 28 sc (4 rows)
9 row: 8 sc, kill * 6, 8 sc (22)
10 row: 8 sc, kill * 3, 8 sc (19)
11 row: 8 sc, kill * 2, 7 sc (17)
12 – 17 row: 17 sc (6 rows)
18 row: (1 sc, kill) * 5, 2 sc (12)
19 row: kill * 6 (6)
Finish knitting. Thread to tear, tighten and hide.
I knitted from Alize Cotton Gold, hook # 2.
HANDLES (2 PCS)
1 row: Dial 4 VP Starting from the 2nd ce from hook: 2 sc, (3 sc in one loop), continue to knit on the other side of the chain: 1 sc, pr (8)
2 row: pr, 1 sc, pr * 3, 1 sc, pr * 2 (14)
3 Row: (6 sc, pr) * 2 (16)
4 – 6 row: 16 sc (3 rows)
7 row: 7 sc, ub3, 6 sc (14)
8 row: 5 sc, kill * 2, 5 sc ( 12)
9 – 16 row: 12 sc (8 rows)
17 row: kill * 6 (6)
Finish knitting. Thread to tear, tighten and hide.
BODY
1 row: 6 sc in spacecraft (6)
2 row: pr * 6 (12)
3 row: (1 sc, pr) * 6 (18)
4 row: (1 sc, pr, 1 sc) * 6 (24)
5 row: (3 sc, pr) * 6 (30)
6 row: (2 SNS, pr, 2 SNS) * 6 (36)
7 row: (5 SNS, pr) * 6 (42)
8 row: (3 SNS, pr, 3 SNS) * 6 ( 48)
9 – 18 row: 48 sc (10 rows)
19 row: (1 sc, kill) * 12, 12 sc (36)
20 row: (1 sc, kill) * 8, 12 sc (28)
21 row: (2 sc, kb) * 4, 12 sc (24)
22 row: 24 sc (24)
23 row: (2 sc, kb) * 3, 12 sc (21)
24 – 26 row: 21 sc (3 rows)
Leave the long end of the thread for sewing on the head.
HEAD
1 row: 6 sc in the spacecraft (6)
2 row: pr * 6 (12)
3 row: (1 sc, pr) * 6 (18)
4 row: (1 sc, pr, 1 sc) * 6 (24 )
5 row: (3 Sc, pr) * 6 (30)
6 row: (2 Sc, pr, 2 sc) * 6 (36)
7 row: (5 sc, pr) * 6 (42)
8 row: (3 SBS, Ave, 3 SBS) * 6 (48)
9 Row: (7 SBS, Ave) * 6 (54)
10 Row: (4 SBS, Ave, 4 ScS) * 6 (60)
11 – 20 Row: 60 SCH (10 rows)
If you use safe eyes, place them between 10 and 11 side by side. Distance between eyes 3-4 sc.
I made the distance between the eyes of 4 sc, but in the photo the author has one bear 3 sc and the other has 4 sc. Therefore, it’s up to you to decide what distance between the peephole to do))
21 row: (4 sc, kill, 4 sc) * 6 (54)
22 row: (7 sc, kill) * 6 (48)
23 row: (3 sc, kill, 3 SBN) * 6 (42)
24 row: (5 SBN, kil) * 6 (36)
25 row: (2 SBN, kil, 2 SBN) * 6 (30)
26 row: (3 SBN, kil) * 6 (24)
27 row: (1 SBN, kil, 1 SBN) * 6 (18)
28 row: (1 SBN, kil) * 6 (12)
29 row: kill * 6 (6) The
thread is cut, fastened and hidden.
EARS (2 PCS)
1 row: 6 scs in spacecraft (6)
2 row: pr * 6 (12)
3 row: (3 scs, pr) * 3 (15)
4 – 6 row: 15 scs (3 rows)
7 Row: (1 sc, kb) * 5 (10)
Leave the long end of the thread to be sewn to the head.
ASSEMBLY and REGISTRATION
№1. We sew the head to the body.
We mark on the head with a different color of thread the space between the 3rd and 4th row and sew behind it the head to the body.
№2. We sew handles with the help of thread fastening (between the 4th and 5th rows of the body).
№3. We sew the legs with the help of thread fastening (between the 8th and 9th rows of the body).
№4. Sew ears to the head for 9 – 11 rows.


