Hello dear Amigurumi Followers
Today we share Amigurumi Cute Beagle Dog Free Pattern for you. As you know we share new free amigurumi pattern every day. The main crochets are gazelle, amigurumi bear, pola, crochet panda, penguin, giraffe, llama, pig, bunny, clown, lamb, bee, crochet unicorn, amigurumi doll, fox, penguin, dinosaur, crochet elephant, hippo, monkey, crochet cat, crochet dog and more …
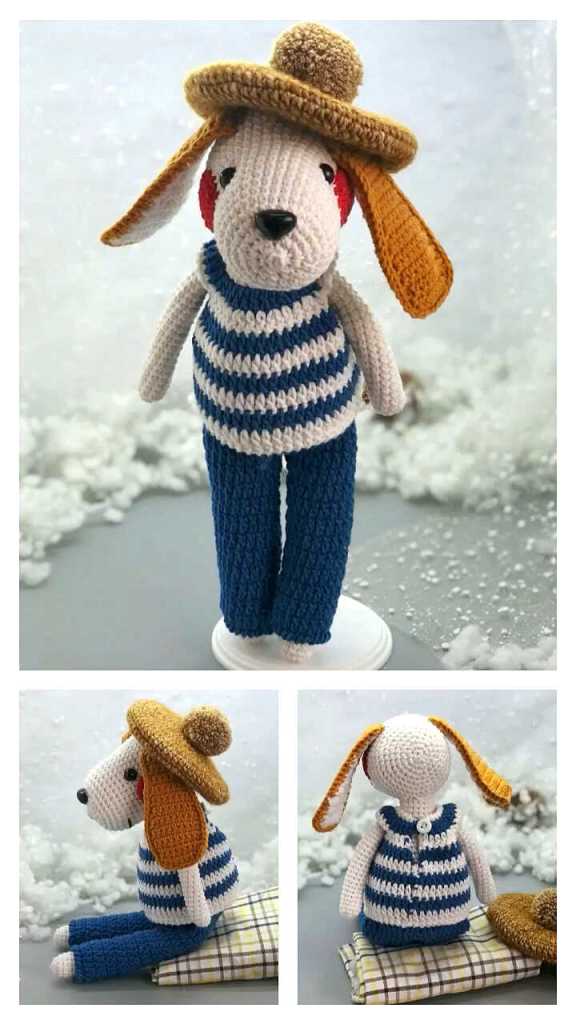
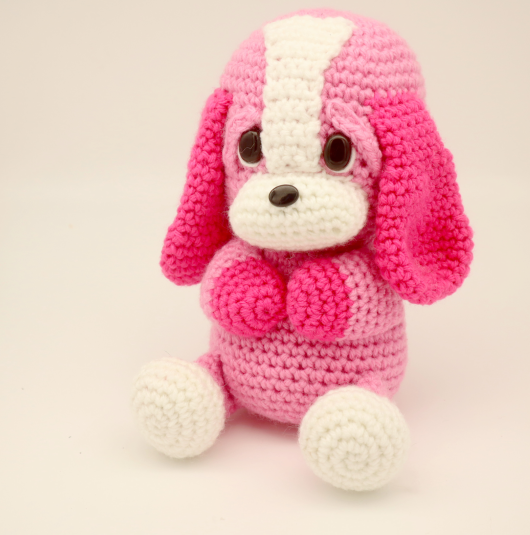
Todays daily new amigurumi free crochet pattern is Amigurumi Cute Beagle Dog.
I want to give you some informations about this amigurumi free pattern ; Cute Beagle Dog.
Supplies:
• Yarn 4/Medium Weight in…
Main color, Contrast color, and white
•4mm Crochet Hook
•Tapestry needle
•Scissors
•Stuffing
•Large oval shape safety eyes for the nose and eyes
Additional Information:
Difficulty: Easy
Let’s get started!
Amigurumi Cute Beagle Dog Free Pattern:
Head/Body:
Start in Main Color
Round 1: 6 Sc into a Magic Ring (6)
Round 2: *Inc* all around (12)
Round 3: *Inc, Sc in the next st* all around (18)
Round 4: *Inc, Sc in the next 2 st* all around (24)
Round 5: *Inc, Sc in the next 3 st* all around (30)
Round 6: *Inc, Sc in the next 4 st* all around (36)
Round 7: *Inc, Sc in the next 5 st* all around (42)
Round 8: *Inc, Sc in the next 6 st* all around (48)
Round 9-15: *Sc* all around (48)
Now we’re going to mark where to place the eyes. Add an eye stitch marker into the 15th and 20th stitch in Round 15.
Round 16: *Dec, Sc in the next 6 st* all around (42)
Round 17-18: *Sc* all around (42)
Round 19: *Dec, Sc in the next 5 st* all around (36)
Round 20-21: *Sc* all around (36)
Round 22: *Dec, Sc in the next 4 st* all around (30)
Round 23: *Sc* all around (30)
Round 24: *Dec, Sc in the next 3 st* all around (24)
Add the eyes in the marked areas. Stuff the head now.
Round 25: *Dec, Sc in the next 2 st* all around (18)
Round 26: In the Front Loop Only, *Inc, Sc in the next 2 st* all around (24)
Round 27: *Inc, Sc in the next 3 st* all around (30)
Round 28: *Inc, Sc in the next 4 st* all around (36)
Round 29: *Inc, Sc in the next 5 st* all around (42)
Round 30-40: *Sc* all around (42)
Round 41: *Dec, Sc in the next 5 st* all around (36)
Round 42: *Dec, Sc in the next 4 st* all around (30)
Stuff the body here. Continue stuffing after each round.
Round 43: *Dec, Sc in the next 3 st* all around (24)
Round 44: *Dec, Sc in the next 2 st* all around (18)
Round 45: *Dec, Sc in the next st* all around (12)
Round 46: *Dec* all around (6)
Finish off, leaving a long tail for sewing. Sew the remaining stitches closed. Weave in ends.

Muzzle:
In whit
To make the muzzle, we’re going to create a chain. We’ll work ENTIRELY around the chain to form a round.
Round 1: Ch 9 (Pic 1). Sc 3 times in the 2nd Ch from the hook (Pic 2). Sc in the next 6 st. Sc 3 times in the last Ch. Now we meet the end of the chain (Pic 3). Turn to the other side where we haven’t made ANY stitches yet (Pic 4). Continuing on that other side, Sc in the next 6 st (18)


Round 2: *Inc* in the next 3 st, Sc in the next 6 st, *Inc* in the next 3 st, Sc in the next 6 st (24)
Round 3: *Sc* all around (24)
Add a stitch marker into the 10th stitch made in Round 3. This will mark where to place the nose later.
Round 4-5: *Sc* all around (24)
Finish off, leaving a long tail for sewing. Add the safety nose into the marked area. Pin the muzzle on as shown and sew on, being sure to add stuffing before fully sewing closed. Once sewn on, weave in ends.

Face Patch:
In white
Row 1: Ch 5. Sc in the 2nd Ch from the hook. Sc in the next 3 st (4)
Row 2-10: Ch 1 and turn. Sc in the next 4 st (4)
Row 11: Ch 1 and turn. Inc in the next st, Sc in the next 2 st, Inc in the next st (6)
Row 12-14: Ch 1 and turn. Sc in the next 6 st (6)
Row 15: Ch 1 and turn. Inc in the next st, Sc in the next 4 st, Inc in the next st (8)
Finish off, leaving a long tail for sewing. Pin the face patch on as shown and sew on.

Eyebrows: (Make 2)
In main color

Row 1: Ch 8. Sc in the 2nd Ch from the hook. Sc in the next 6 st (7)
Finish off leaving a long tail for sewing. Pin the eyebrow over the eye and sew on. Weave in ends

Ears: (Make 2)
In contrast color

Round 1: 6 Sc into a Magic Ring (6)
Round 2: *Inc* all around (12)
Round 3: *Inc, Sc in the next st* all around (18)
Round 4: *Inc, Sc in the next 2 st* all around (24)
Round 5-7: *Sc* all around (24)
Round 8: *Dec, Sc in the next 2 st* all around (18)
Round 9-13: *Sc* all around (18)
Round 14: *Dec, Sc in the next st* all around (12)
Round 15-19: *Sc* all around (12)
Finish off, leaving a long tail for sewing. Pin the ears on as shown and sew on and weave in the ends.

Eye Whites:
In white
Insert the needle close to the toy’s eye and pull the needle out where shown (Pic 1). Reinsert the needle where shown (Pic 2) and pull the needle out where we originally inserted the needle (Pic 2). You will have two tail ends of yarn coming out of the same spot (Pic 3). Tie both ends of yarn into a firm knot and bring into the toy to hide. Cut excess yarn


Arms: (Make 2)
In contrast color

Round 1: 6 Sc into a Magic Ring (6)
Round 2: *Inc* all around (12)
Round 3: *Inc, Sc in the next 3 st* all around (15)
Round 4-5: *Sc* all around (15)
Round 6-12: Change to Main Color. *Sc* all around (15)
Finish off, leaving a long tail for sewing. Stuff the arm very lightly. Pin the arm onto the body as shown and sew on. Once fully sewn on, weave in ends.

Legs: (Make 2)
Start in white

Round 1: 6 Sc into a Magic Ring (6)
Round 2: *Inc* all around (12)
Round 3: *Inc, Sc in the next st* all around (18)
Round 4: *Inc, Sc in the next 2 st* all around (24)
Round 5-7: *Sc* all around (24)
Round 8: *Dec, Sc in the next st* 5 times. Sc in the next 9 st (19)
Round 9: *Dec* 5 times, Sc in the next 9 st (14)
Round 10-15: Change to Main Color. *Sc* all around (14)
Finish off, leaving a long tail for sewing. Stuff the leg now. Pin the leg onto the body as shown and sew on. Once fully sewn on, weave in ends.

Arm Securing:
In contrast color
Place both of the toy’s hands together and insert the needle through both as shown (Pic 1). Tie both ends of yarn into a firm knot 2 times (Pic 2). Bring the tail ends of yarn into the toy’s hands (Pic 3). Cut any excess yarn. Done! (Pic 4).


Tail:
In main color
Round 1: 6 Sc into a Magic Ring
Round 2: *Sc* all around (6)
Round 3: *Inc* all around (12)
Round 4-7: *Sc* all around (12)
Finish off, leaving a long tail for sewing. Stuff the tail. Pin the tail to the butt area of the dog, sew on and weave in ends.
More Amigurumi Dog Ideas:
