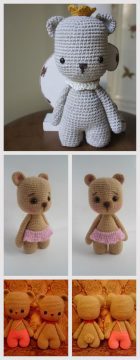
Supplies
yarn:
Teddy’s Wool Classic 100% Acrylic 100g, 240mt
Shade 1450 (Beige) yarn
Teddy’s Wool Classic 100% Acrylic 100g, 240mt
Shade 1386 (Red) yarn
Teddy’s Wool Classic 100% Acrylic 100g, 240mt
Shade 2197 (Pink) yarn
3,0 mm crochet hook
2 Black 12mm safety eyes toy
you can use French knot, buttons or paint eyes,
For children under the age of 3 use embroidered eyes.
Soft stuffing (poly fill, cotton wool etc.)
Black embroidery thread
Yarn needle, scissors, stitch marker
Abbreviations
R = round
rep = repeat until end of round
st = stitch
ch = chain stitch
sc = single crochet stitch
sc2tog = single crochet two together (single crochet decrease)
dc = double crochet stitch
hdc = half double crochet stitch
FLO = front loop only
BLO = back loop only
sl st = slip stitch
f/o = fasten off

Head and Body with 1450 (Beige) yarn.
Head and body crochet from one piece,
We start from the top of the head and finish at the bottom of the body.
R1: magic circle with 6(stitch) (6)
R2: 2(single crochet stitch) in each (stitch) (12st)
R3: 1(single crochet stitch) then 2(single crochet stitch) in next (stitch) rep 6 times (18st)
R4: 1(single crochet stitch) in next 2(stitch) then 2(single crochet stitch) in next (stitch) rep 6 times (24st)
R5: 1(single crochet stitch) in next 3(stitch) then 2(single crochet stitch) in next (stitch) rep 6 times (30st)
R6: 1(single crochet stitch) in next 4(stitch) then 2(single crochet stitch) in next (stitch) rep 6 times (36st)
R7: 1(single crochet stitch) in next 5(stitch) then 2(single crochet stitch) in next (stitch) rep 6 times (42st)
R8: 1(single crochet stitch) in next 6(stitch) then 2(single crochet stitch) in next (stitch) rep 6 times (48st)
R9 -18: 1(single crochet stitch) in each (stitch) for 10 rows (48st)
Attach safety toy eyes between rounds 13 and
14, leaving 8 stitches (count 7 holes) between them.
R19: 1(single crochet stitch) in next 6(stitch) then (single crochet stitch)2tog rep 6 times (42st)
R20: 1(single crochet stitch) in next 5(stitch) then (single crochet stitch)2tog rep 6 times (36st)
R21: 1(single crochet stitch) in next 4(stitch) then (single crochet stitch)2tog rep 6 times (30st)
R22: 1(single crochet stitch) in next 3(stitch) then (single crochet stitch)2tog rep 6 times (24st)
R23: 1(single crochet stitch) in next 2(stitch) then (single crochet stitch)2tog rep 6 times (18st)
R24: 1(single crochet stitch) in next 4(stitch) then (single crochet stitch)2tog rep 3 times (15st)
R25: 1(single crochet stitch) in next 2(stitch) then 2(single crochet stitch) in next (stitch) rep 5 times (20st)
R26: 1(single crochet stitch) in next 4(stitch) then 2(single crochet stitch) in next (stitch) rep 4 times (24st)
R27: 1(single crochet stitch) in next 3(stitch) then 2(single crochet stitch) in next (stitch) rep 6 times (30st)
R28 : 1(single crochet stitch) in next 4(stitch) then 2(single crochet stitch) in next (stitch) rep 6 times (36st)
Stuff firmly and shape the head.
Switch color with 1386 (Red) yarn
R29-34: 1(single crochet stitch) in each (stitch) for 6 rows (36st)
R35: 1(single crochet stitch) BLO (back loop only) in each (stitch) for 1 row (36st)
Switch color with 1450 (Beige) yarn
R36: 1(single crochet stitch) in next 5(stitch) then 2(single crochet stitch) in next (stitch) rep 6 times (42st)
R37-40: 1(single crochet stitch) in each (stitch) for 4 rows (42st)
R41: 1(single crochet stitch) in next 5(stitch) then (single crochet stitch)2tog rep 6 times (36st)
Stuff firmly and shape the body, add more fiberfill
into the neck area if needed to prevent the head
from dropping later.
R42: 1(single crochet stitch) in next 4(stitch) then (single crochet stitch)2tog rep 6 times (30st)
R43: 1(single crochet stitch) in next 3(stitch) then (single crochet stitch)2tog rep 6 times (24st)
Keep stuffing and shaping
R44: 1(single crochet stitch) in next 2(stitch) then (single crochet stitch)2tog rep 6 times (18st)
R45: 1(single crochet stitch) in next (stitch) then (single crochet stitch)2tog rep 6 times (12st)
R46: 1(single crochet stitch) in next (stitch) then (single crochet stitch)2tog rep 4 times ( 8st )
Before closing the hole, add a little bit more fiberfill if needed and make sure the bottom is a little bit flat so the teddy
bear girl can sit.
R47: (single crochet stitch)2tog twice, sl (stitch) in the next (stitch), fasten off and use yarn tail to weave in and out of the remaining stitches, pull
tight until the hole is completely closed, knot off and hide yarn tail inside the body. (See page 16 how to close a hole)
SKIRT
Now go back to row 35, By crocheting in the BLO (back loop only) you created a ridge, this is where you will
crochet the skirt.


Here is the ridge you created Turn the teddy bear girl upside down

In the beginning of the lower ridge
Insert the hook under a loop pull and
create the first single crochet.

Crochet the first round
R48: 1(single crochet stitch) in each (stitch) for 1 row (36st)
the end of the ridge will be a bit higher then the beginning so just join them with a (single crochet stitch).
R49: 1(single crochet stitch) in next 5st then 2(single crochet stitch) in next (stitch) rep 6 times (42st)
Switch color with 2197 (Pink) yarn
R50: 1(single crochet stitch) in each (stitch) for 1 row (42st)
R51: Chain 3 then 1dc in each (stitch), join with a slip stitch (42st)
R52: Chain 3 then 1dc in each (stitch), join with a slip stitch (42st)
Switch color with 1386 (Red) yarn
R53: 1(single crochet stitch) in each (stitch) for 1 row (42st)
R54: Chain 3 then 1dc into the same stitch then 2dc in each stitch, join with a slip stitch (84st)
Fasten off and hide yarn tail inside the body and weave in the ends on the wrong side.

Legs make 2, with 1450 (Beige) yarn.
The foot is an oval shape, we start with a chain (see page 14 How to crochet an oval)
R1: Ch 8 then 2(single crochet stitch) in to the second chain from hook, then 1(single crochet stitch) in next 5(stitch) then 4(single crochet stitch) in the last chain, Turn and
work on the other side, 1(single crochet stitch) in the next 5(stitch) then 2(single crochet stitch) in the last chain (18st) Do not join round,
Place the Marker!

R2: 1(single crochet stitch) in next 2(stitch) then 2(single crochet stitch) in next stitch rep 6 times (24st)
R3: 1(single crochet stitch) in next 3(stitch) then 2(single crochet stitch) in next stitch rep 6 times (30st)
R4: 1(single crochet stitch) in next 9(stitch) then 2(single crochet stitch) in next stitch rep 3 times (33st)
R5: 1(single crochet stitch) BL (back loop only) in each stitch for 1 row (33st)
R6: 1(single crochet stitch) in each stitch for 1 row (33st)
R7: 1(single crochet stitch) in next 9(stitch) then (single crochet stitch)2tog rep 3 times (30st)
R8: 1(single crochet stitch) in next 3(stitch) then (single crochet stitch)2tog rep 6 times (24st)
R9: 1(single crochet stitch) in next 8(stitch) then (single crochet stitch)2tog 4 times then 1(single crochet stitch) in next 8(stitch) (20st)
R10: 1(single crochet stitch) in next 8(stitch) then (single crochet stitch)2tog 3 times then 1(single crochet stitch) in next 6(stitch) (17st)
Stuff the feet and shape, keep adding soft stuffing into the leg
after every few rows.
R11-19:1(single crochet stitch) in each stitch for 9 rows (17st)
R20: 1(single crochet stitch) in next 7(stitch) then (single crochet stitch)2tog then 1(single crochet stitch) in next 8(stitch) (16st)
R21: 1(single crochet stitch) in next 2(stitch) then (single crochet stitch)2tog rep 4 times (12st)
R22: 1(single crochet stitch) in next stitch then (single crochet stitch)2tog rep 4 times (8(stitch))
R23: 1(single crochet stitch) in each stitch for 1 row (8(stitch))
R24: (single crochet stitch)2tog twice, sl stitch in the next stitch, fasten off and use yarn tail to weave in and out of the remaining stitches, pull
tight until the hole is completely closed, knot off and hide yarn tail inside the leg. (See page 16 how to close a hole)
Arms with red sleeves make 2, start with 1450 (Beige) yarn.

R1: magic circle with 6(stitch) (6)
R2: 2(single crochet stitch) in each (stitch) (12(stitch))
R3: 1(single crochet stitch) then 2(single crochet stitch) in next (stitch) rep 6 times (18(stitch))
R4: 1(single crochet stitch) in next 8(stitch) then 2(single crochet stitch) in next (stitch) rep 2 times (20(stitch))
R5-6: 1(single crochet stitch) in each (stitch) for 2 rows (20(stitch))
R7: 1(single crochet stitch) in next 8(stitch) then sc2tog rep 2 times (18(stitch))
R8: sc2tog 3 times then 1(single crochet stitch) in next 12(stitch) (15(stitch))
R9: sc2tog then 1(single crochet stitch) in next 13(stitch) (14(stitch))
stuff the hand and shape, keep adding a bit of soft stuffing after
every few rows leaving the red sleeve free off stuff
R10-13: 1(single crochet stitch) in each (stitch) for 4 rows (14(stitch))
R14: 1(single crochet stitch) in next 12(stitch) then sc2tog (13(stitch))
R15-16: 1(single crochet stitch) in each (stitch) for 2 rows (13(stitch))
R17: 1(single crochet stitch) in next 11(stitch) then sc2tog (12(stitch))
Switch color with 1386 (Red) yarn
R18: 1(single crochet stitch) then 2(single crochet stitch) in next (stitch) rep 6 times (18(stitch))
R19: 1(single crochet stitch) in next 2(stitch) then 2(single crochet stitch) in next (stitch) rep 6 times (24(stitch))
R20: 1(single crochet stitch) in each (stitch) for 1 row (24(stitch))
R21 : 1(single crochet stitch) in next 2(stitch) then sc2tog rep 6 times (18(stitch))
R22: 1(single crochet stitch) in next (stitch) then sc2tog rep 6 times (12(stitch))
R23: 1(single crochet stitch) in next (stitch) then sc2tog rep 4 times ( 8(stitch) )
R24: sc2tog twice, sl st in the next (stitch), fasten off and use yarn tail to weave in and out of the remaining stitches, pull
tight until the hole is completely closed, knot off and hide yarn tail inside the arm.
Ears make 2, with 1450 (Beige) yarn.
R1: magic circle with 6(stitch) (6)
R2: 2(single crochet stitch) in each (stitch) (12(stitch) )
R3: 1(single crochet stitch) then 2(single crochet stitch) in next (stitch) rep 6 times (18(stitch) )
R4: 1(single crochet stitch) in next 2(stitch) then 2(single crochet stitch) in next st rep 6 times (24(stitch) )
R5: 1(single crochet stitch) in each (stitch) for 1 row (24(stitch) )
R6: 1(single crochet stitch) in next 2(stitch) then sc2tog rep 6 times (18(stitch) )
R7: 1(single crochet stitch) in each (stitch) for 1 row (18st)
sl st in the next (stitch) fasten off, leaving a long tail for sewing.
Do not stuff the ears.

Muzzle with 1450 (Beige) yarn.
R1: magic circle with 6(stitch) (6)
R2: 2(single crochet stitch) in each (stitch) (12(stitch))
R3: 1(single crochet stitch) then 2(single crochet stitch) in next (stitch) rep 6 times (18(stitch))
R4: 1(single crochet stitch) in next 2(stitch) then 2(single crochet stitch) in next (stitch) rep 6 times (24(stitch))
R5: 1(single crochet stitch) in next 3(stitch) then 2(single crochet stitch) in next (stitch) rep 6 times (30(stitch))
R6-7: 1(single crochet stitch) in each (stitch) for 2 rows (30(stitch))
Stuff the muzzle
sl st in the next (stitch) fasten off, leaving a long tail for sewing.

Tail with 1450 (Beige) yarn
R1: magic circle with 6(stitch) (6)
R2: 2(single crochet stitch) in each (stitch) (12(stitch))
R3- 4: 1(single crochet stitch) in each (stitch) for 2 row (12(stitch))
R5: 1(single crochet stitch) in next 4(stitch) then sc2tog rep 2 times (10(stitch))
Stuff very lightly the tail.
sl st in the next stitch fasten off, leaving a long tail for sewing.

Bow
1: Chain 55 and then Join with a slip stitch to form a ring (make sure it is long enough to wrap around the head)
R2: 1(single crochet stitch) in each (stitch)
sl st in the next stitch cut the yarn fasten off and weave in the ends.

Flower
R1: magic circle with 8(stitch) (8)
R2: 1(single crochet stitch) in next 3st then 2(single crochet stitch) in next st rep 2 times (10stitch)
R3: Chain 3 then 3dc into the same stitch then 1(single crochet stitch) in next stitch rep 5 times.
Fasten off and weave in all the ends on the wrong side.

Disc Flower
R1: magic circle with 6(stitch) (6)
R2: 1(single crochet stitch) in next (stitch) then 2(single crochet stitch) in next st rep 3 times (9(stitch))
sl st in the next (stitch) fasten off, leaving a long tail for sewing.


Sewing the Muzzle


Place the muzzle just beneath row 13 in the middle, pin it to the head
and add a little bit more fiberfill if needed. sew in place, fasten with a knot
and hide yarn tail inside the head.


A. Insert the needle in a hole between stitches some distance away from where you will embroider the nose.
B. Bring the needle to the starting point at the center just above row 4 for the embroidering, pull it through and leave a long tail.


2. Make a vertical stitch along 5 stitches at the center line. draw the thread tight.
3. Insert the needle horizontal along 6 stitches to form the nose and draw the thread tight.
4. Start embroidering the nose horizontal until the nose is big enough.


5. Insert the needle and bring it out at the same hole between stitches where you insert the starting thread and pull it through.
6. Knot the two ends together twice.


7. Reinsert the two threads into the needle and then insert the needle into the same hole where both ends emerge and
bring it out in a different point on the head, pull it through and cut them off.
Connecting the Legs and Arms to the Body
In this basic methods I explain how to make joints limbs connected to each other through the body with a yarn and
remain still movable.
Legs


Place the legs to the sides of the body and mark with a pin where the legs will be attached to the body.
place the pin just beneath row 40.
Arms


Place the arms to the sides of the body and mark with a pin where the arms will be attached to the body.
place the pin just beneath row 26 and make sure that the hand bulge is facing the front.
This example is for Legs and
Arms
1. After you mark with a pin where the limbs will be attached
to the body , cut a long yarn (same yarn you used for the
body) long enough to go from one side to the other side of
the body.
2. Insert the needle where you mark with a pin and pass the
needle through the body from one side to the other side
where is the second mark pin. squash the body so it will be
more easy for you to push the needle all the way through
leaving a long yarn tail on the first side.
3. Make a small stitch on inside of one limb bring the needle
at the point where the joint will be.
4. Pass the needle back through the body so the needle
reappears again close to the starting yarn.
5. Make a small stitch at the inside of the second limb and
make sure that the height is the same as the stitch on the first
limb.
If you want to make a stronger joint, repeat the entire process
again.
6.The two yarn tails ends should be close together.
pull tight to attach firmly the limbs into the side of the body
and tie the two ends together 3 times.
7. Reinsert the 2 yarn tails into the needle and then insert the
needle into the body and bring it out in a different point on
the body, pull it through and cut the yarn tails off.
If you did it right, the limbs will stay in the position you set
them without falling down. If you didn’t attach firmly, the limbs
will fall down when you release them.
To fix it you can stitch through the joints again more tightly
and cut the old yarn off or leaving it in place.


Sewing the Tail


Sewing the Ears


