Hello dear Amigurumi Followers
Today we share Amigurumi Big Girl Cat Free Pattern for you. As you know we share new free amigurumi pattern every day. The main crochets are gazelle, amigurumi bear, pola, crochet panda, penguin, giraffe, llama, pig, bunny, clown, lamb, bee, crochet unicorn, amigurumi doll, fox, penguin, dinosaur, crochet elephant, hippo, monkey, crochet cat, crochet dog and more …
Todays daily new amigurumi free crochet pattern is Amigurumi Big Girl Cat.
I want to give you some informations about this amigurumi free pattern ; Big Girl Cat.
“MUSCLE CASH”
Information about the master class:
✓ The toy is knitted in a spiral (unless specified otherwise)
✓ To mark the beginning of the series, use a special marker, or a string of contrasting color
✓ The master class does not contain teaching lessons on crochet. The skills you need to beat !!!
✓ The master class contains a complete description of the process of knitting toys + photo details
✓ It is forbidden to distribute, sell and publish the description!
Necessary materials: – YarnArt basic yarn Dolce 757 mustard, 741 white, hook # 5 or any other convenient for you; – two plastic beads for eyes with a diameter of 16mm; – strings of black mulina, coral; – dry pastel for toning – wire for the tail and neck. – fabric for decoration; – filler holofayber
The size of the toy: 38 cm
CONVENTIONAL SYMBOLS:
VP – air loop
RLS – column without crochet
SSN – column with crochet
PRIB – an increase (two bars are tied in one loop)
UB – reduction (two bars are connected together)
SS – connecting post

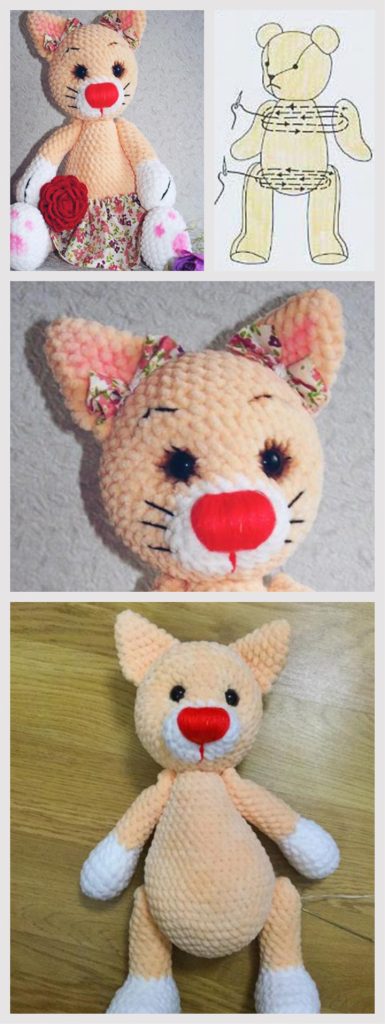
Amigurumi Big Girl Cat Free Pattern
We knit in a spiral. We use white yarn.
Hook No. 5.0
Row 1: 2 VP for the second loop from the hook loop 6 SBN (12)
Row 2: 6 PRIB (12)
Row 3: (1 RLS, PRI) * 6 times (18)
Rows 4-5: 18 RVS (3 rd)
Change to mustard color
Row 6: 1 RLS and move the marker – this will be the start of the series, 3 scs,PRIB * 3 times, 6 RLS, PRI * 3 times, 3 RLS (24)
Row 7: (PRI, 2 sc) * 8 times (32)
Between 7 and 8, insert the eyes, leaving a gap of 5 bars
Row 8: 5 RLS, (PRI, 1 RLS) * 10 times, PRI, 5 RLS (42)
Row 9-12: 42 RVS (4 rows)

Row 13: 42 of the RLS (42) by tying 24 RLSs to move the marker, this compensates for the shortening of the side that can occur when working in a circle (to do if necessary)
Rows 14-15: 42 RVS (2 rounds)
Row 16: (UB, 5 RLS) * 6 times (36)
Row 17: 36 RVS (36)
Row 18: 1 RLS and move the marker – this will be the beginning of the series, (UB, 4 sc) * 6 times (30)
Row 19: (UB, 3 RLS) * 6 times (24)
Row 20: 24 RLS (24)
Now you can insert special fasteners, frame, button hinge, or bolt through the center of the head: between 12 and 13 rows.Now start filling with filler.
TIPS: if you wish, you can simply sew the head to the trunk.
Row 21: (UB, 1 RLS) * 8 times (16)
Continue packing, giving the necessary form, watch the uniformity of packing on all sides.
Row 22: 16 RVS (16)
Row 23: (UB) * 8 times (8) we make the tightening
We finish the SSBN, we leave the thread for stitchingFinish the packing so that it rounds the back of the head.
We collect the half loops of the last row with a needle and tighten them. We hide the thread inside the head and cut it.

Ears (2 pieces)
Row 1: Collect mustard thread 2 VP and close in a ring. Spray 4 RLS, then we knit in a circle (4)
Row 2: 4 PRI (8)
Row 3: (3 RLS, PRI) * 2 times (10)
Row 4: (4 sc, prib) * 2 times (12)
Row 5: (5 RLS, PRI) * 2 times (14)
Row 6: (6 RLS, PRI) * 2 times (16)
Row 7: (7 RLS, PRI) * 2 times (18)
Do not stuff. Thread the wire, cut off. Sew on a solid thread (for example, an iris in three pieces and a long needle)

PENDING THE MUFF
Eye registration:

From the occipital part of the head from the neck, insert the yoke into the point 1 (the thread inside), leave the tip for the nodule, pull the needle to the point 2 (the thread from the outside), pull the needle into the point 3 (the thread inside) and bring it to point 4 (the thread outside ) draw, insert the needle at point 5 (the thread inside) and bring it to point 6 (the thread from the outside), pull off, insert the needle at point 7 (the thread inside) and bring it to point 8 (the thread from the outside). To pull off to make a knot, to hide a thread.Ears:Place the ears symmetrically on each side of the head. Sew it.

Embroider eyebrows, mouth, mustache, nose, focusing on the photo.Make eye toning with dry pastels.

HANDLES (2 pieces)
We knit a white thread in a circle. Hook No. 5.0
Row 1: 5 VP, 2 RLS in the second from the hook, 2 RLS, 3 RLS in the last loop. Then we knit on the other side of the chain: 2 СБН, 1 СБН in the first loop of the chain (10)

Row 2: PRIB * 2 times, 2 RLS, PRI * 3 times, 2 RLS, PRI (16)
Row 3: (PRI, 7 RLS) * 2 times (18)
Rows 4-5: 18 RLS (2 rows)
Row 6 : (4 СБН, УБ) * 3 times (15)
Row 7: (3 СБН, УБ) * 3 times (12)
Row 8: (УБ, 4 СБН) * 2 times (10)
Change the thread to the mustard
Row 9- 18: 10 RLS (10 rounds) To fill is not tight.
Row 19: Loss before closing the hole. Strip the thread, hide the tip.
LEGS (2 pieces)
A thread of white color. Hook No.5.0
Row 1: We dial a chain of 9 VP, 2 RLS into the second loop from the hook,6 sc, 3 sc in the last loop of the chain. Then we knit from the other side of the chain: 6 СБН, 1 СБН in the first loop of the chain (18)We put the marker and start knitting in a circle.
Row 2: PRIB * 2 times, 6 RLS, PRI * 3 times, 6 RLS, PRI (24)
Row 3: (1 RLS, PRI) * 2 times, 6 RLS, (1 RLS, PRI) * 3 times, 7 RLS,PRI (30)
Rows 4-6: 30 RVS (30)
Row 7: 10 RLS, 2 UB, 2 RLS, 2 UB, 10 RLS (26)
Row 8: 2 RLS, UB, 6 RLS, 3 UB, 6 RLS, UB, 2 RLS (21)
Row 9: 1 RLS, UB, 3 RLS, 2 UB, 1 RLS, 2 UB, 3 RLS, UB, 1 RTS (15)
Row 10: (3 RLS, UB) * 3 times (12)
Change the thread to mustard
Rows 11-20: 12 RLS (10 rows)
We fill with filler tight enough
Row 21: Losses before closing the hole. We fasten the thread, cut off, hide the tip.

BODY, ASSEMBLY
We knit a thread of mustard color. Down up. Hook No.5.0

Row 1: 2 VP for the second from the hook loop we sew 6 СБН (6)
Row 2: 6 PRIB (12)
Row 3: (RLS, PRI) * 6 times (18)
Row 4: (2 RLS, PRI) * 6 times (24)
Row 5: (3 RLS, PRI) * 6 times (30)
Row 6: (4 RLS, PRI) * 6 times (36)
Row 7: (5 RLS, PRI) * 6 times (42)
Row 8: (6 RLS, PRI) * 6 times (48)
Ranks 9-14: 48 RVS (6-rounds)

Row 15: (6 sc, uv) * 6 times (42)
Row 16: (5 RLS, UB) * 6 times (36)
Rows 17-18: 36 RVS (2 rounds)
Series 19: (4 sc, ub) * 6 times (30)
Rundown 20: 30 RLS (30)
Row 21: (3 RLS, UB) * 6 times (24)
Rows 22-23: 24 RVS (2 rounds)
Row 19: (2 RLS, UB) * 6 times (18)
Fill with a holofiber
Row 21: (1 СБН, УБ) * 6 times (12)
The thread is fixed, we cut off, we hide the tip. Sew our head to the trunk. To be exactly, pre-attach it with pins. We put the wire in the head and the tip in the neck. Approximately 20 cm.
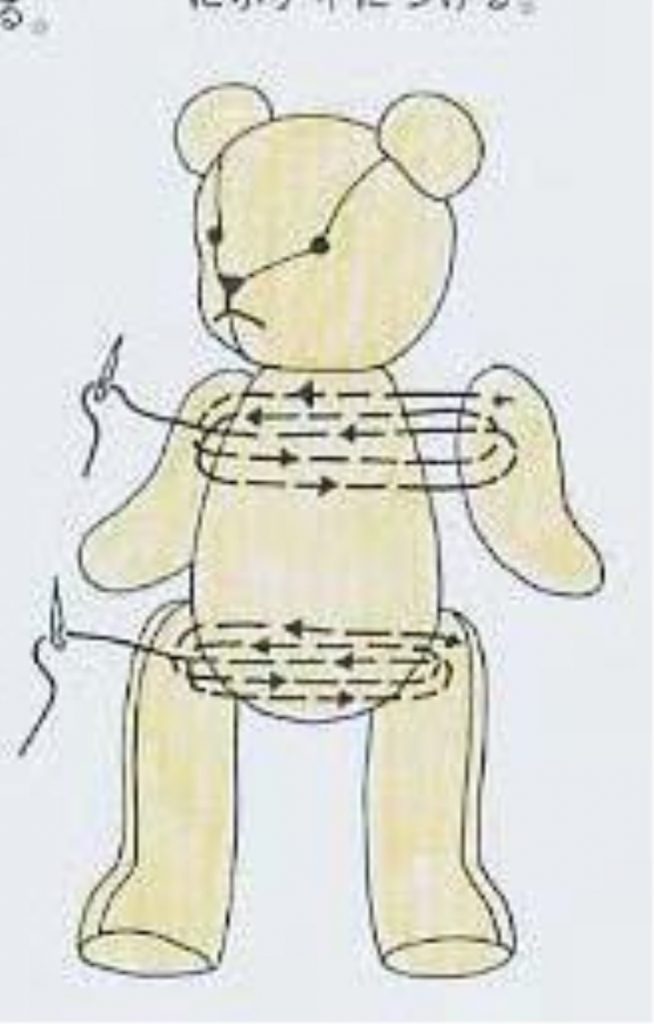
I attach the handles and legs to the movable thread fastener.I use a very strong nylon thread (sold in fishingshops) and a long needle. Or a string of iris in several additionsWe fasten handles and legs(see the figure for an example)

We fix a strong thread on the inner side of the paw at the intended point, pierce the trunk through and give a second paw at the same point from the inside, grabbing 1-2 RLS. We pass the needle through the trunk in the opposite direction and again pierce the paw at the same point. After doing this operation several times, we tighten the thread so that the paws do not hang out, and bring it into the armpit or into the place of future fastening of the tail, fix it. We make a belly button between 12 and 13 near the bottom.
TAIL
Row 1: 2 VP for the second from the hook loop we sew 6 СБН (6)
Row 2: 6 PRIB (12)
Rows 3-6: 12 RVS (4 rows)
We change the thread to mustard
Rows 7-23: 12 RVs (17ths)
Fasten the thread, leave the tipfor sewing.We reconcile and sew on the placetail. Take care that the tail does notprevented the cat from getting gray, but notwas placed too high.Insert the wire if desired.Adorned to your choice.


