Hello dear Amigurumi Followers
Today we share Amigurumi Cute Doll Tutorial Free Pattern for you. As you know we share new free amigurumi pattern every day. The main crochets are gazelle, amigurumi bear, pola, crochet panda, penguin, giraffe, llama, pig, bunny, clown, lamb, bee, crochet unicorn, amigurumi doll, fox, penguin, dinosaur, crochet elephant, hippo, monkey, crochet cat, crochet dog and more …
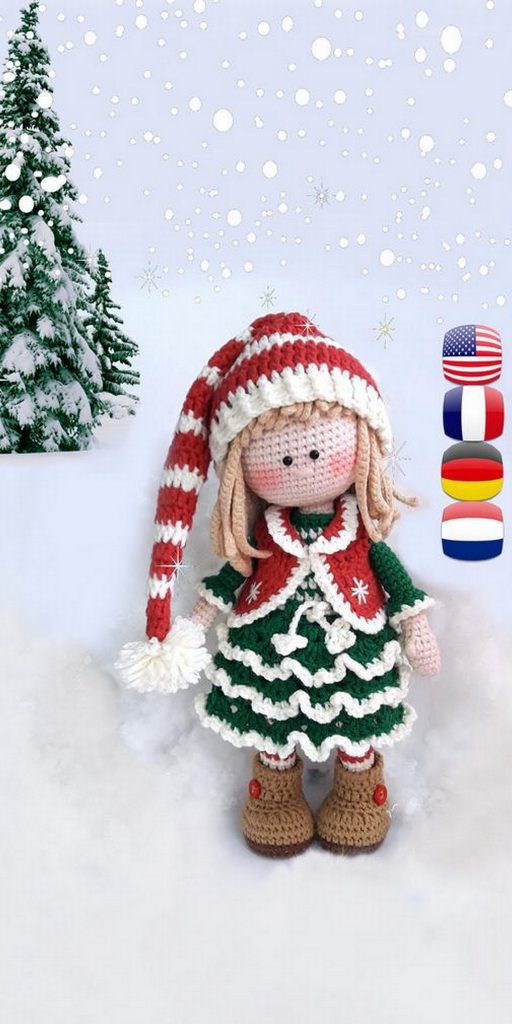
Todays daily new amigurumi free crochet pattern is Amigurumi Cute Doll.
I want to give you some informations about this amigurumi free pattern ; Cute Doll.
Necessary materials:
2.5 no knitting needles
1 piece of tan yarn
1 pcs white thread
1 pair of 12 mm amigurumi eye
1 piece white felt
1 black nylon yarn
Bead fiber
Explanation:
Our baby crochet techniques in the construction of the incidence rate of the chain tension, increase and decrease ‘ve used techniques. I think anyone who can keep a crochet can do it. Amigurumi techniques can be found in the Amigurumi Techniques section at the top of my blog.
You can start knitting from the desired section. I usually cover the head before the other parts.
You can use a different color thread at the beginning of the sequence as a placeholder, so that you are not surprised at which order you are knitting.
The number of repetitions outside the parentheses in the recipe shows how many times we should do the operation in parentheses. The numbers at the end of the row show how many grueling s / he would have at that time.
We need to do the filling process when we knit the pieces. For this we need to fill the parts without missing the queues we can fill comfortably in this order. When filling the parts, push the fiber in and then push the fibers towards the edges of the piece and form the pieces.
Let’s see how we start before we start knitting the amigurumi.
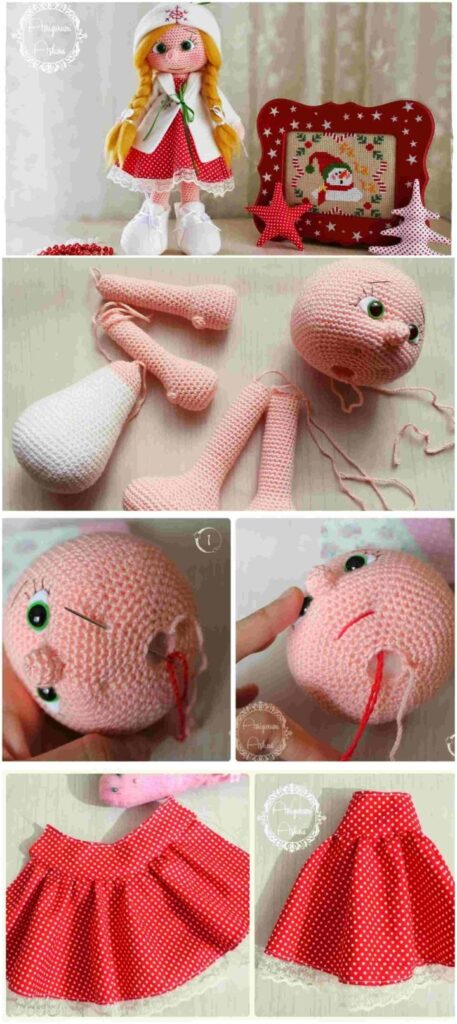
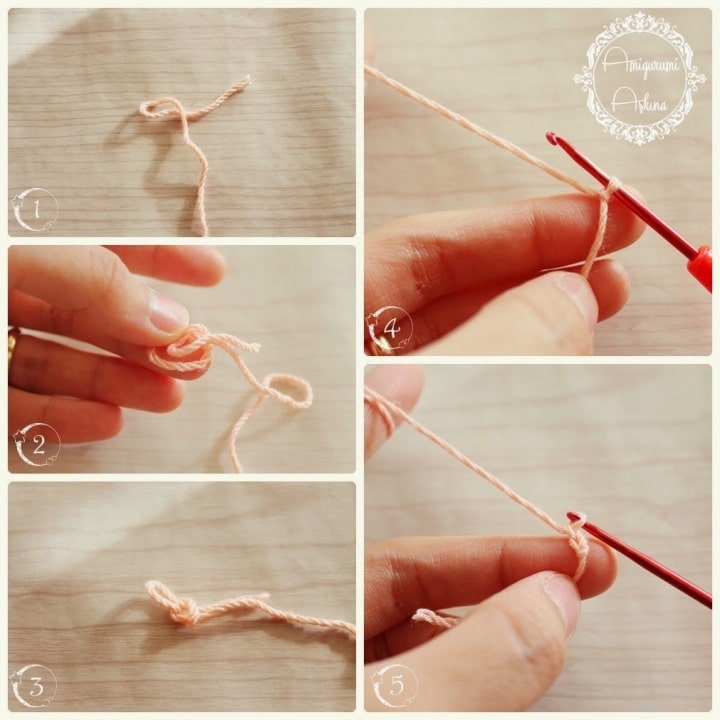
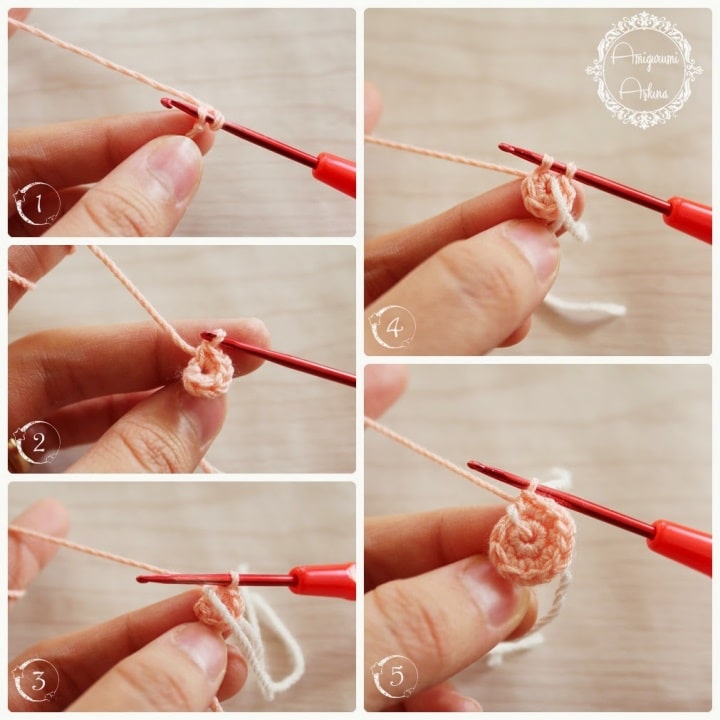
When I start amigurumi, I start by pulling two chains and filling in the second chain. In the first of the following photos I showed the chain pulling stages and in the second the filling and placemarking in the chain.
Amigurumi Cute Doll Tutorial Free Pattern
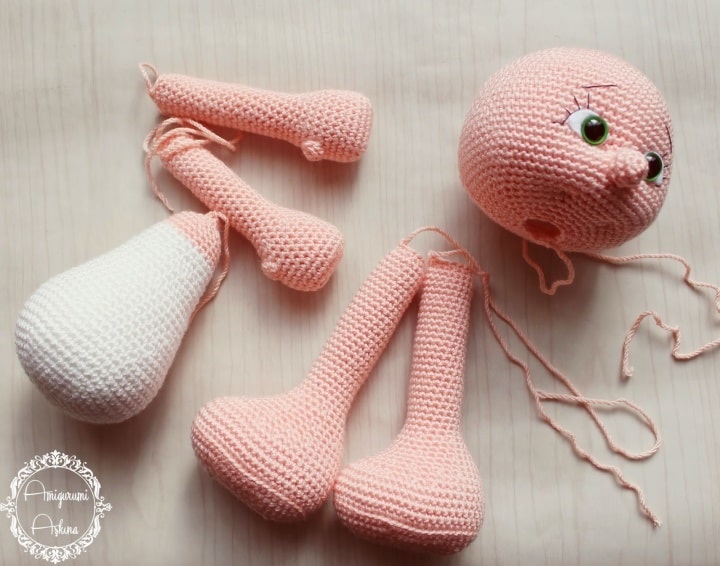
HEAD We’re
starting with skin color yarn.
1. 2 chains are drawn and 6 tighteners are made inside the chain (like in the two above pictures.)
2. 2 squeezes into each squeeze, 6 times (12)
3. (1 tightness, 1 increase) 6 times again (18)
4. (2 tighten, increase 1) 6 times again (24)
5. (3 tighten, increase 1) 6 times again (30)
6. (4 tighten, increase 1) 6 times again (36)
7. (5 tightness, 1 increase) 6 times again (42)
8. (6 tightness, 1 increase) 6 times again (48)
9. (7 tightness, 1 increase) 6 times again (54)
10. (8 tightness (1 increase) 6 times again (60)
11. (9 tightness, 1 increment) 6 times again (66) 12. (10 tightness, 1 increase) 6 times again (72) 13th to 26th time: Every sıkiğne an incidence rate of (72) 27 (10 incidence rate of 1 detract) repeated 6 times (66) 28 (9 incidence rate of 1 elsilt ) repeated 6 times (60) 29 (8 incidence rate of 1 elsilt ) repeated 6 times (54 ) 30 (7 incidence rate of 1 elsilt ) repeated 6 times (48) 31 (6 incidence rate of 1 elsilt ) 6 times again (42) In the meantime, we start to fill the head with bead fiber.
32. (5 times, 1 elsilt ) 6 times again (36)
33. (4 tightness, 1 elsilt ) 6 times again (30) Our
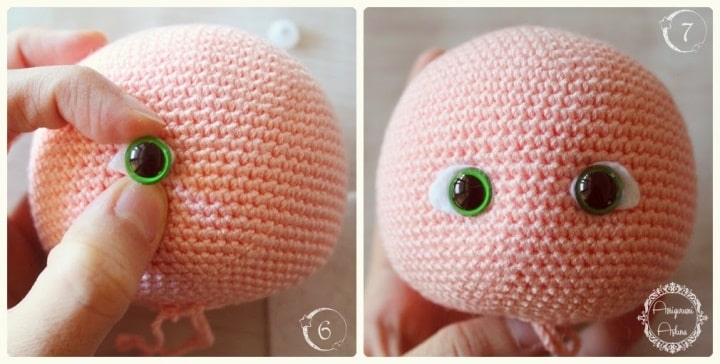
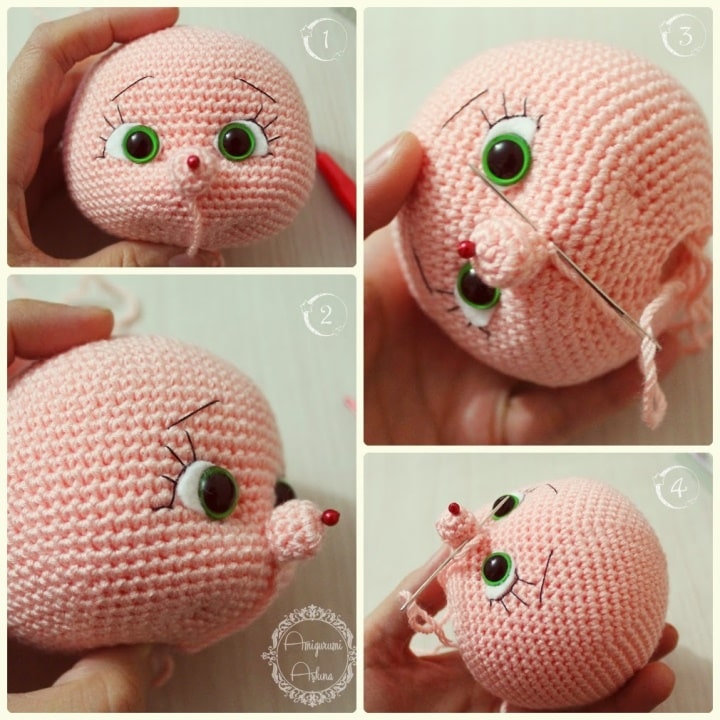
hands before entering the place we are wearing the eyes thoroughly shrink. As in the picture, we cut and cut a piece from the white felt to the back of the eye. With the scissors we make a hole in the felt and pass the eye through this hole. Your head is 22-23. between the rows, between the 9 tightness of the eyes are wearing.
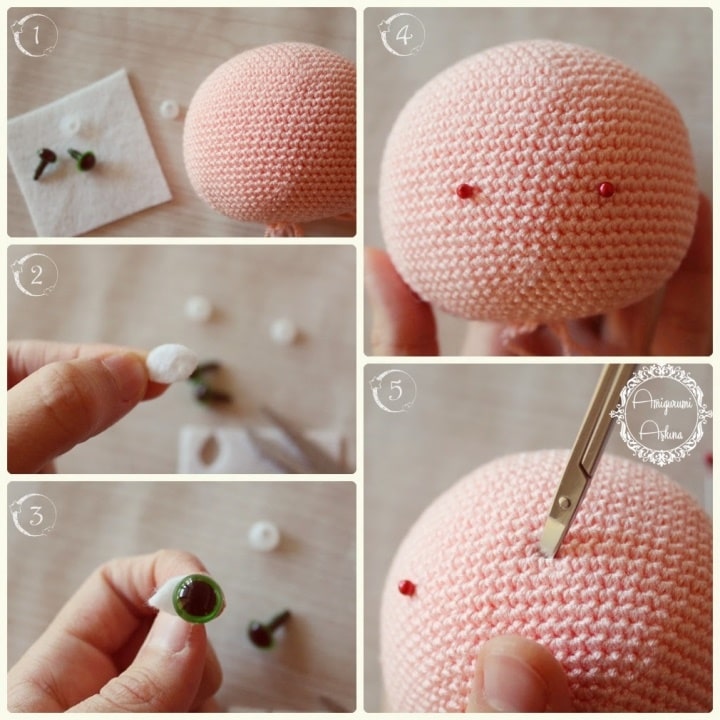
After we fill the head a little more, we continue to subtract.
34 (3 incidence rate of 1 elsilt ) repeated 6 times (24)
35 (2 incidence rate of 1 elsilt ) repeated 6 times (18)
36 (1 incidence rate of 1 elsilt ) repeated 6 times (12)
Leaves 20 cm long thread for sewing.
NOSE We
start with the skin color.
1. 2 chains are drawn and 2 knives are made inside the chain.
2. 2 squeezes into each squeeze, 6 smears (12)
3. Squeeze each squeeze into a squeezer (12)
4. (2 squeeze, 1 squeeze) 3 times again (9) We
leave 10 cm long thread to sew.
BODY
Start with white color. (If desired, the skin color can also be knitted.)
1. 2 chains are drawn and 2 knives are made inside the chain.
2. 2 squeeze into each squeeze, 6 times (12)
3. (1 tightness, 1 increase) 6 times again (18)
4. (2 tighten, increase 1) 6 times again (24)
5. (3 tighten, increase 1) 6 times again (30)
6. (4 tighten, increase 1) 6 times again (36)
7. (5 tightness, 1 increase) 6 times again (42)
8. (6 tightness, 1 increase) 6 times again (48)
9. (7 tightness, 1 increase) 6 times again (54)
10. (8 tightness 1 increases) repeated 6 times (60)
18.sır interface between 11.sır a: Each sıkiğne an incidence rate of (60)
19 (8 incidence rate of 1 elsilt ) repeated 6 times (54)
20. Each sıkiğne an incidence rate of (54)
21. (7 squeezing, 1 elsilt ) 6 times again (48)
22-23. For each squeeze, a squeeze (48) is applied to
24 (6 squeezing, 1 sill ) 6 times (42)
25-26. For each squeeze a squeeze (42)
27. (5 squeezing, 1 sachet6 times again (36)
28th to 30th . For each squeeze, a squeeze (36) was made
31 (4 squeeze, 1 sillt ) 6 times again (30)
. For each squeeze, we go to a squeezer (30)
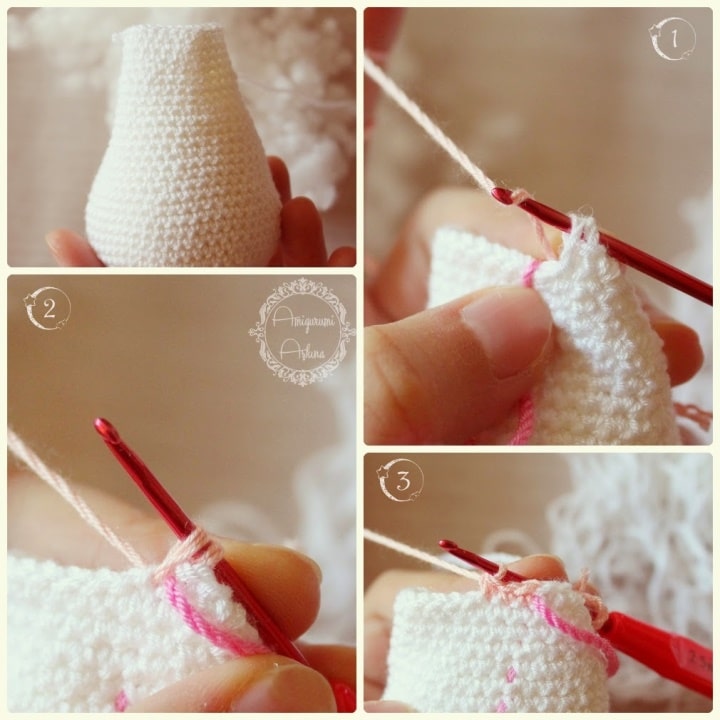
We keep dropping. 34. (3 shakes, 1 elsilt ) 6 times again (24) 35-36. Each sıkiğne an incidence rate of (24) 37 (2 incidence rate of 1 elsilt ) repeated 6 times (18) 38 (1 incidence rate of 1 elsilt ) repeated 6 times (12) 39. 6 detract (6) Hand and Arm tan yarn here we go. 1. 8 chains are drawn. Go back .2. from the chain 6 to the next to the chain in the next 3 tightness, the chain continues from the other side. 5 tighten, increase 1 (16)
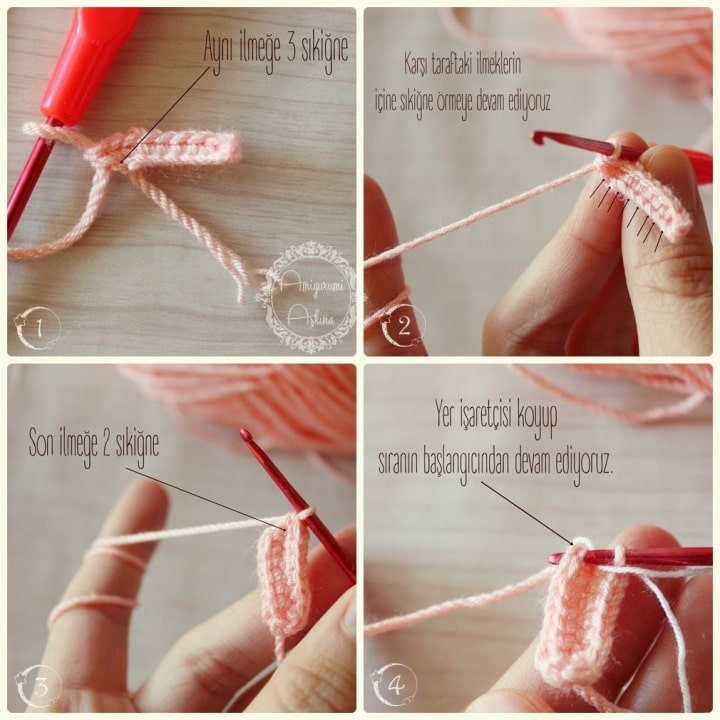
2. (1 squeezing, 1 increments) Repeat 8 times (24)
3-7S: each squeeze to a squeeze (24)
8. 12 squeezes, (1 popcorn, the following illustration), 11 squeezes (24)
Finger ie For popcorn, we make the railroad four times. While we are performing the boot, we unload the thread we normally take on the crochet on two occasions, we unload the first in the popcorn technique, the second one stays on top of the crochet, and after we make the last one, we unload them together. And we continue.
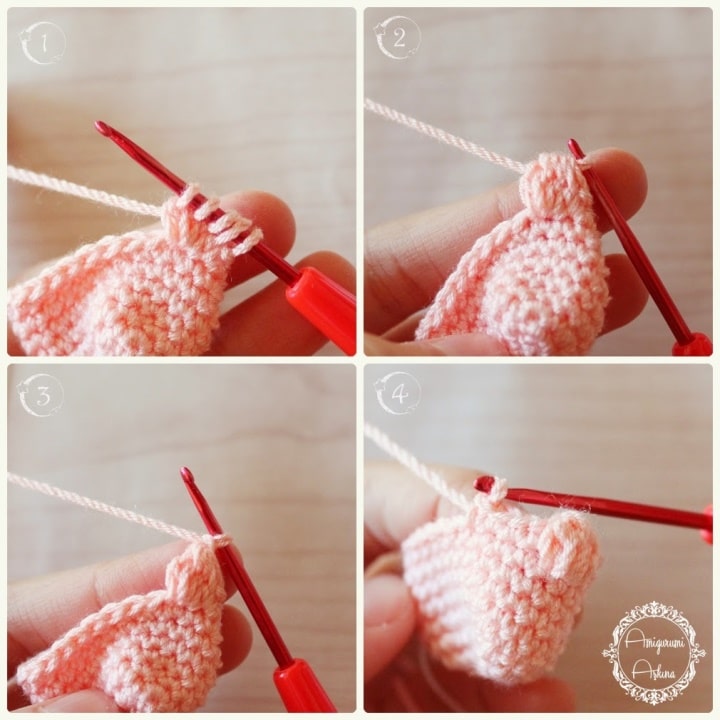
9-10. Each sıkiğne an incidence rate of (24)
11 (2 incidence rate of 1 elsilt ) repeated 6 times (18)
12 (4 incidence rate of 1 detract) repeated 3 times (15)
13-31.sır are between: each sıkiğne an incidence rate of (15 )
32 (3 incidence rate of 1 detract from) three times again (12)
will leave a 20 cm length of yarn to sew.
Feet and legs
are starting to flesh-colored yarn.
1-10 chain is drawn. We’il get back.
2 into the chain 2 tightness, next to each of the 7 chains 1 tightness, the last chain 4 tighten.Gifts to the other side of the chain to the other chain of the chain and the last chain 2 tightness (22)
2- we continue from the first tightness of the first order. .
(1art) 2 times again, 6 squeezing, (1 increase) 6 times again, 6 squeezing, (1 increase) 2 times again (32)
3- 1 squeezing, 1 increase, 7 squeezing, (1 increase, 1 squeezed) 7 times repeated, the first boost, 6 incidence rate of 1 increases, the first incidence rate a (42)
4- (6 incidence rate of 1 increases) repeated 6 times (48)
5- (7 incidence rate of 1 increases) repeated 6 times (54)
6. Each squeezing a squeeze (54)
8- BLO as a squeeze to each squeeze (54)
8-11. between the rows: a squeezer (54)
12- 14 squeezing, 1 extract, 1 squeeze, 1 extract, 2 squeezing, (1 subtract) 8 times repeat, 2 squeezing, 1 extract, 1 squeezing, 1 extract, 10 squeezing ( 42)
13- A squeezer (42)
14- 10 squeezing for each squeeze ( 1 squeezing, 1 squeezing) 8 times again, 8 squeezing (34)
15-16. Each sıkiğne an incidence rate of (34)
17- (2 incidence rate of 1 detract) 8 once again, the second incidence rate of (26)
18- (1 detract) two times again, 22 incidence rate of (24)
19 each sıkiğne an incidence rate of (24)
20 – (2 squeezing, 1 elsilt ) 6 times again (18)
21-45.Search: each squeezing (18)
46- (1 squeeze, 1 sill ) 6 times again (12) We
leave 20 cm long thread to sew.
FACE EXPRESSION: We
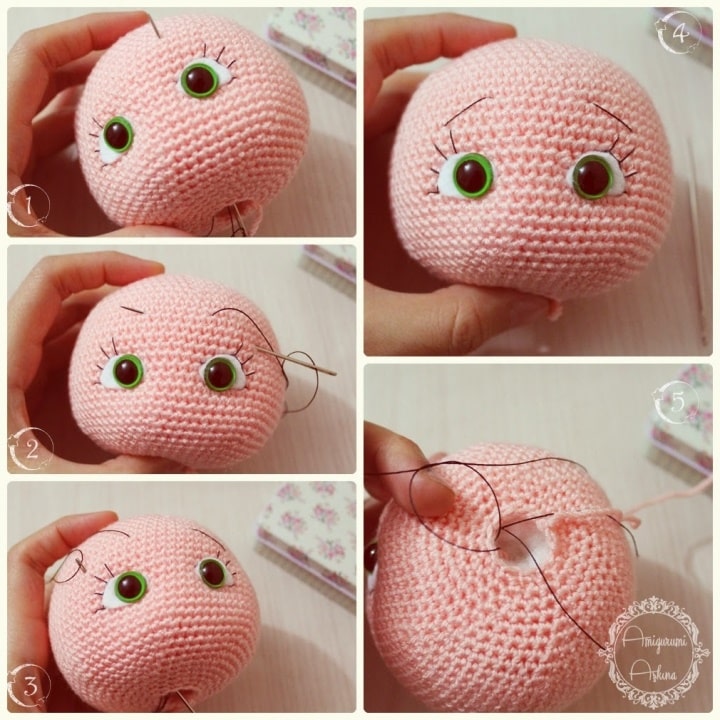
use a quilt needle and nylon thread to process eyelashes. We put the needle in the space where the head ends and we take it out of the proper place as in the photo. First we process the upper periphery of the eye (1, 2, 3 and 4). In the 6th stage we put the needle through the rope that we process around the eye. So we’re fixing around the eyes. The shape of the eyelash is completely up to you, I wanted to get a little Turkan Soray ciliated, you can make it more sparse or more often.
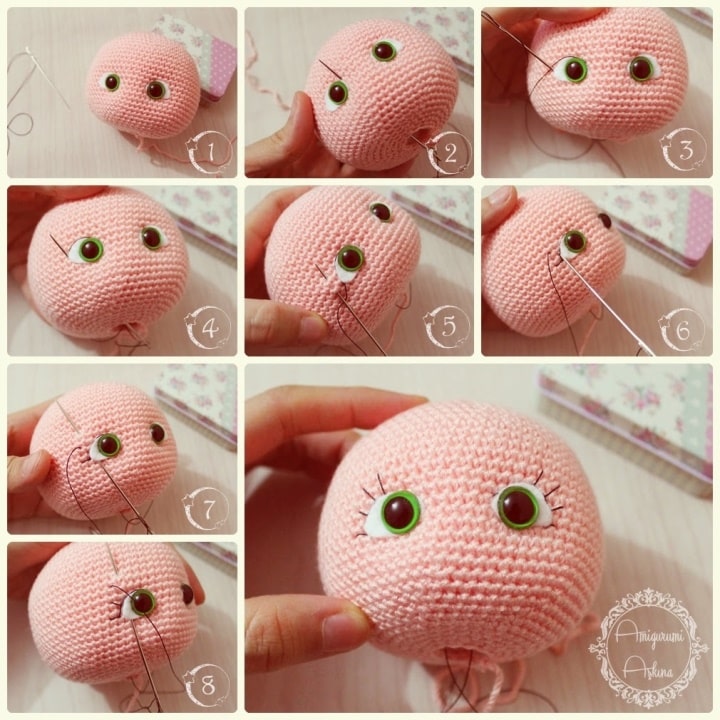
We’re starting to process the eyebrows by cutting the rope or inserting a new thread. The places you set for Kas also determine the expression of your baby. At the same time, if you want a happy, upset, confused or innocent baby, you must process the eyebrows accordingly. Mine was a slight bliss. You can catch this expression when you pull the eyebrows down a bit.
Finally, we cut the yarn and knot
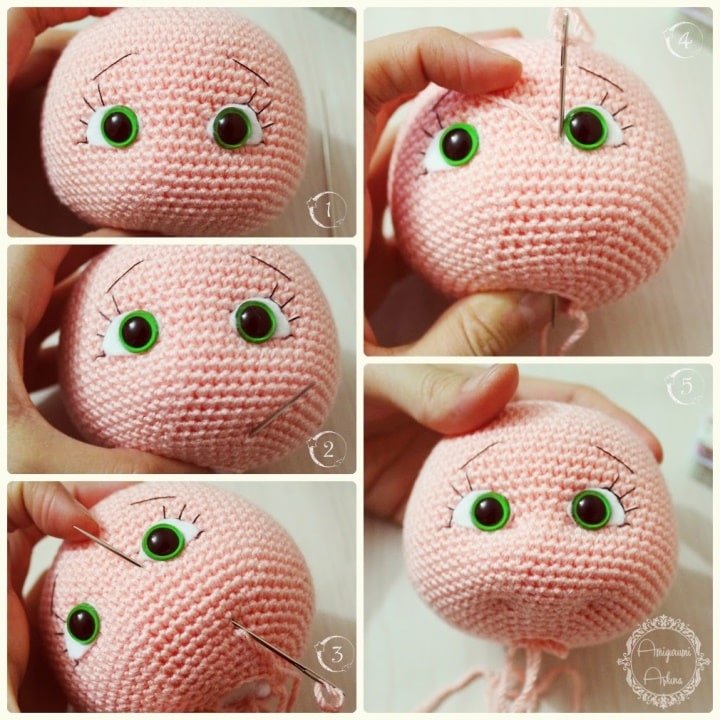
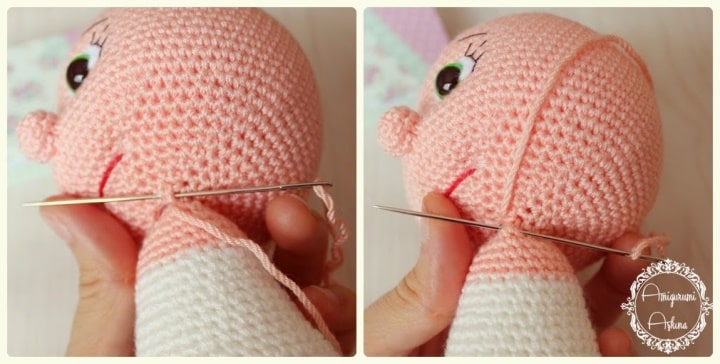
To give a natural smile to our baby’s face and to create lines we need to create pits in certain places. We use our quilt needle again for this. Following the steps in the photo, we put the thread through the specific parts of the head. After pulling the thread, we remove the yarn from the end point of the head and hold the two ends of the head.
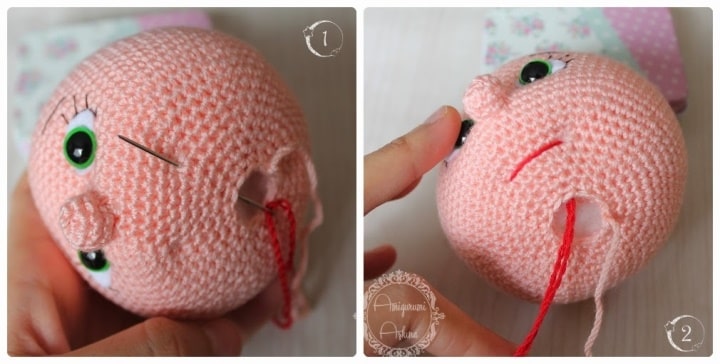
After you have created the mouth part in the coloration .. For this, we select any color thread we have inserted into the needle, insert the head into the cavity of the mouth pit, and the other mouth into the pit, we remove the head space out again. We make the necessary corrections and tie knots by pulling the yarn.
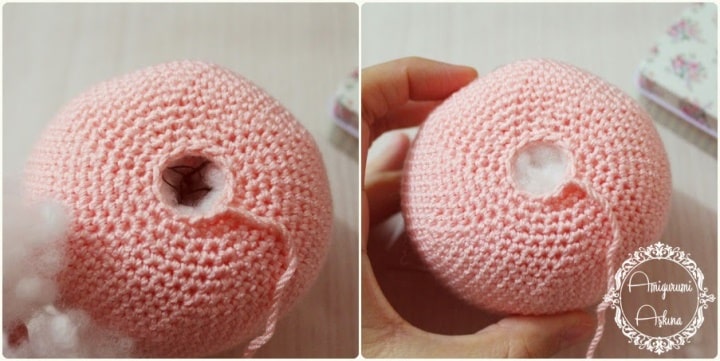
After doing the last process in the head, we fill the void with a little more fiber.
CONNECTING PARTS:
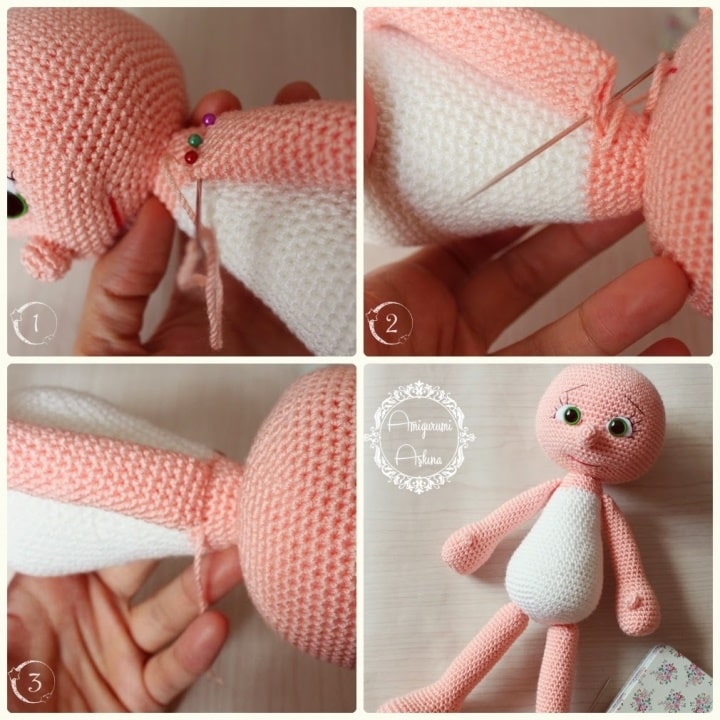
We start by sewing the heads into the hull. We just have to sew the nose first. After fixing the appropriate location with a pin pin we fix it as follows. You can see how the rope is hidden in the sewing stages of the leg.
The sewing technique used when sewing the pieces together is always the same. First we will sew through the piece of the piece is passed through the piece itself. If you examine the photos, you can catch the trick.This way you can get a regular seam.
Planting the head on the body:
Sewing of legs and hiding the rope:
We must first determine the appropriate location for the legs while sewing the leg. After we’ve stitched the two legs, we must hide the remaining threads after we have tied them as in the photo.
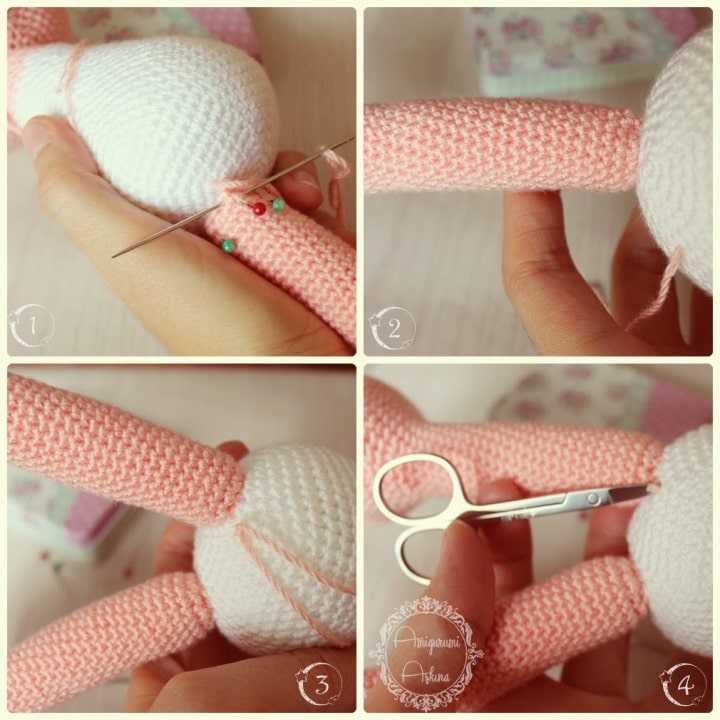
Planting the arms:
When we are sewing the arm, we have to keep our baby straight and determine the appropriate arm positions. We need to fix it with a pin to ensure a proper seam.
PATTERNING OF CLOTHES:
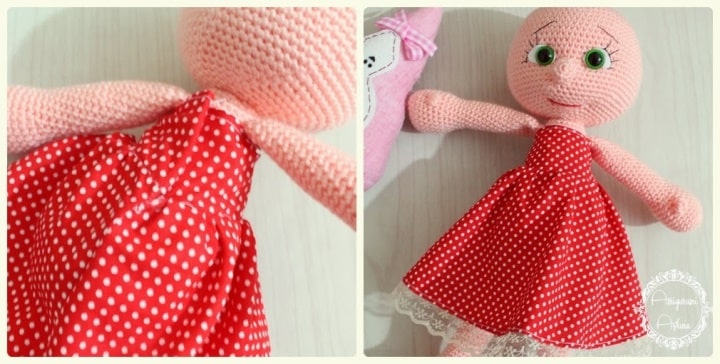
Yeah, now it’s the sewing phase, which I’m not a master at. You can see how much beginner I have at the seams and cuts 🙂
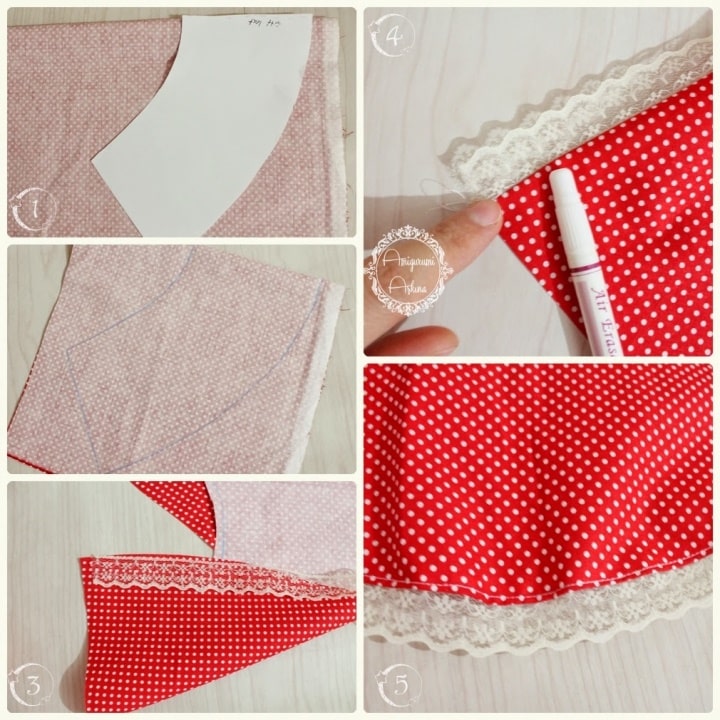
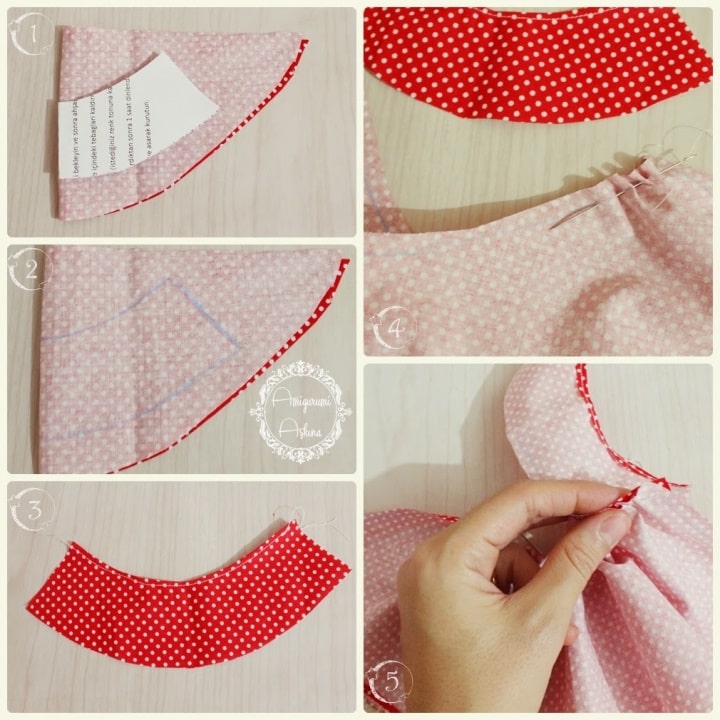
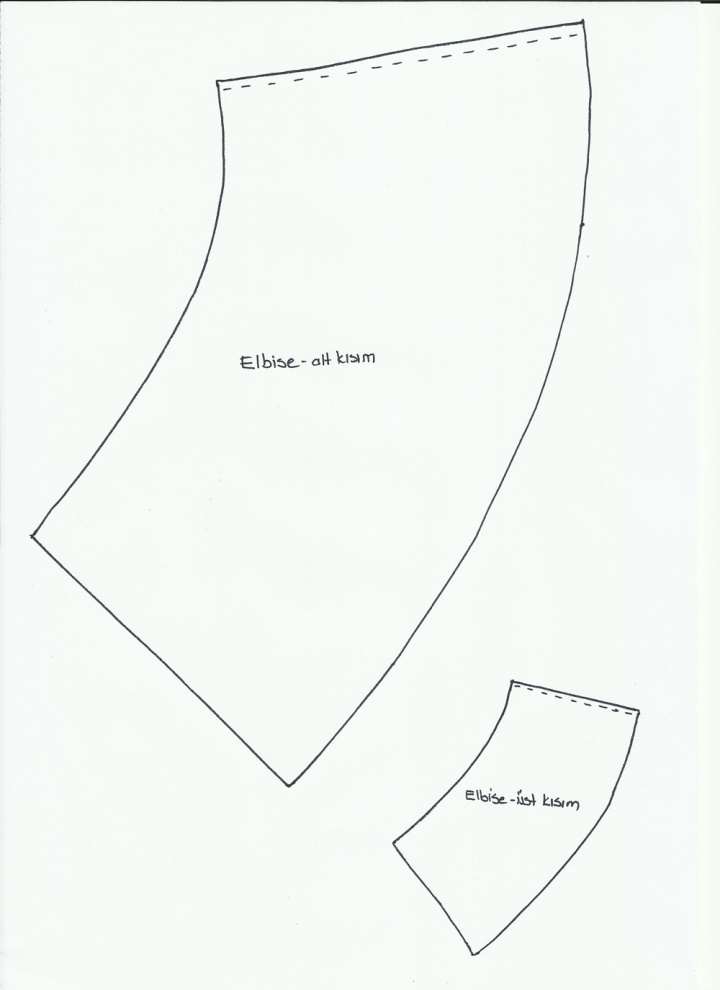
First we start with the dress. I made the pattern of the dress myself, a very practical and easy model. It consists of two parts. We place and draw the dashed lines in our pattern so that the fabric is folded. After drawing the two parts, we leave half a cm-1 cm of seam and cut the pieces.
We sew the lace in the lower part as in the photo (3rd stage in the picture below).
We curl the top edge of the upper part and we sew it (3rd stage).
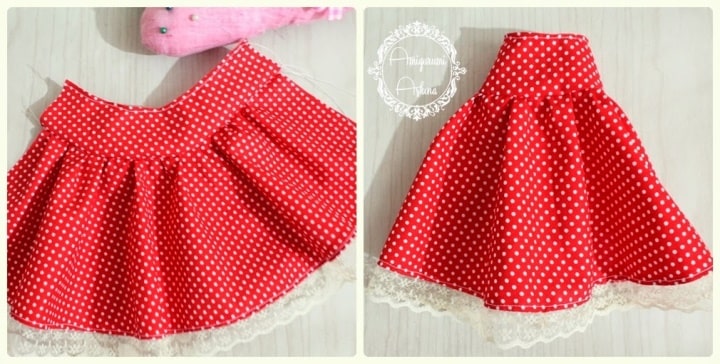
At the back of the dress, we only sew the lower part.
More Amigurumi Doll Ideas:

