Hello dear Amigurumi Followers
Today we share Amigurumi Sailor Moon Doll Free Pattern for you. As you know we share new free amigurumi pattern every day. The main crochets are gazelle, amigurumi bear, pola, crochet panda, penguin, giraffe, llama, pig, bunny, clown, lamb, bee, crochet unicorn, amigurumi doll, fox, penguin, dinosaur, crochet elephant, hippo, monkey, crochet cat, crochet dog and more …
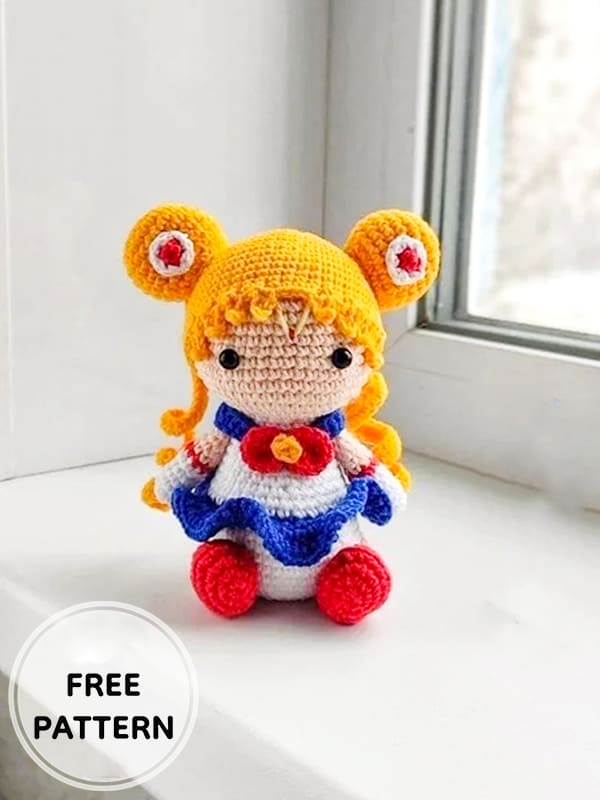
Todays daily new amigurumi free crochet pattern is Amigurumi Sailor Moon Doll.
I want to give you some informations about this amigurumi free pattern ; Sailor Moon Doll.
Materials
• The hook suitable under your yarn. I have Clover Soft Touch 2.00 mm.
• Yarn: beige, blue, red, white, yellow and a light yellow colors. I used «YarnArt
Jeans» yarn (160m in 50g, 55% cotton/45% polyacryl).
• 7 mm black safety eyes.
• Toys filler.
• Scissors.
• Tapestry needle.
• Pins.
• Stitch marker.
Abbreviations
MR – magic ring
Sc – single crochet
Ch – chain stitch
Slst – slip stitch
BLO – through back loops only
Inc – increase (stitch 2 times into the next stitch)
Dec – invisible decrease (crochet 2 sc together using invisible method)
Hdc – half double crochet
Dc – double crochet
(…)х n – repeat instructions in brackets n times
Rnd – round.
Change colors in crochet. Loop your new yarn color over your hook.
Crochet your new yarn color back through the two loops on your hook.
Notes
• Crochet continuously in a spiral, unless otherwise specified.
• In order to not lose track of the number of worked stitches in each round, use a stitch marker to mark the beginning of each round – a thin thread of contrasting color.
• Crochet tightly enough so the filler is not visible through the holes between loops.
• Tightly and gradually fill all the details of the toy in the process of crocheting.
• Size of the finished toy can vary depending on the materials used, the density of crocheting and filling, etc.
Stuff body and head firmly, stuffing as you go.
Amigurumi Sailor Moon Doll Free Pattern:
Body + Head
Start working with white yarn.
Rnd 1. 6 sc MR (6)
Rnd 2. 6 inc (12)
Rnd 3. (1 sc, inc)x6 (18)
Rnd 4. (2 sc, inc)x6 (24)
Rnd 5. (3 sc, inc)x6 (30)
Rnd 6. (4 sc, inc)x6 (36)
Rnd 7. (5 sc, inc)x6 (42)
Rnd 8-10. 42 sc (3 rounds) (42)
Rnd 11. (5 sc, dec)x6 (36)
Rnd 12. 36 sc (36)
Continue on with blue.
Rnd 13. 36 sc (36)
Continue on with white.
Rnd 14. BLO, (4 sc, dec)x6 (30)
Rnd 15. 30 sc (30)
Rnd 16. (13 sc, dec)x2 (28)
Rnd 17. 28 sc (28)
Rnd 18. (12 sc, dec)x2 (26)
Rnd 19. 26 sc (26)
Rnd 20. (11 sc, dec)x2 (24)
Rnd 21. 24 sc (24)
Rnd 22. (2 sc, dec)x6 (18)
Rnd 23. 18 sc (18) Stuff the body.
Now we are going to start crocheting the head.
Continue on with beige.
Rnd 24. 18 inc (36)
Rnd 25. (5 sc, inc)x6 (42)
Rnd 26. (6 sc, inc)x6 (48)
Rnd 27-36. 48 sc (10 rounds) (48)
Rnd 37. (6 sc, dec)x6 (42)
Rnd 38. (5 sc, dec)x6 (36)
Rnd 39. (4 sc, dec)x6 (30)
Place safety eyes between rounds 30 and 31, 9 st apart.
Rnd 40. (3 sc, dec)x6 (24)
Start to stuff the head.
Rnd 41. (2 sc, dec)x6 (18)
Rnd 42. (1 sc, dec)x6 (12)
Rnd 43. 6 dec. Close.
Break the yarn and weave in ends.

Arm x2
Crochet with white.
Rnd 1. 6 sc MR (6)
Rnd 2. (2 sc, inc)x2 (8)
Rnd 3-6. 8 sc (8)
Continue on with red.
Stuff only half of the arms.
Rnd 7. 8 sc (8)
Continue on with beige.
Rnd 8-13. 8 sc (8) Do not stuff of the arms.
This way the arm doesn’t stick out too much after sewing it to the body.
Press the opening with your fingers, aligning 3 stitches side by side.
Break the yarn and leave a long tail to sew arms to body.

Hair
Start working with yellow yarn.
Rnd 1. 6 sc MR (6)
Rnd 2. 6 inc (12)
Rnd 3. (1 sc, inc)x6 (18)
Rnd 4. (2 sc, inc)x6 (24)
Rnd 5. (3 sc, inc)x6 (30)
Rnd 6. (4 sc, inc)x6 (36)
Rnd 7. (5 sc, inc)x6 (42)
Rnd 8. (6 sc, inc)x6 (48)
Rnd 9-16. 48 sc (48)
Rnd 17. 15 hdc, don’t cut the yarn, further there will be curls..
1 sc, 5 ch, starting from second ch from hook, 4 sc, make 1 sc into the next stitch,
(1 sc, 4 ch, starting from second ch from hook, 3 sc, make 1 sc into the next stitch)x3, 2 sc,
(1 sc, 4 ch, starting from second ch from hook, 3 sc, make 1 sc into the next stitch)x3,
1 sc, 5 ch, starting from second ch from hook, 4 sc, make 1 sc into the next stitch,
15 hdc. Total 8 curls. Leave a long tail to sew to head.


Collar
Start working with blue yarn.
Rnd 1. 30 ch, starting from second ch from hook, 2 sc, 3 hdc, 19 dc, 3 hdc, 2 sc (29)
Break the yarn and leave a long tail.
The Bow
Detail x2:
Start working with red yarn.
Rnd 1. 6 sc MR (6)
Rnd 2. 6 inc, sl st (12) Break the yarn and leave a tail.
Small detail x1:
Start working with yellow yarn.
Rnd 1. 5 sc MR, sl st (5) Break the yarn and leave a tail.
Make one bow-knot.
Connect two big details and sew one small detail in the middle
Bun Caps x2
Start working with yellow yarn.
Rnd 1. 6 sc MR (6)
Rnd 2. 6 inc (12)
Rnd 3. (1 sc, inc)x6 (18)
Rnd 4. (2 sc, inc)x6 (24)
Rnd 5-9. 24 sc (5 rounds) (24)
Rnd 10. (2 sc, dec)x6 (18) Stuff.
Break the yarn and leave a long tail.
Detail x2:
Start working with red yarn.
Rnd 1. 6 sc MR (6)
Continue on with white.
Rnd 2. (1 sc, inc)x3 (9) Leave a long tail

Leg x2
Start working with red yarn.
Rnd 1. 6 sc MR (6)
Rnd 2. 6 inc (12)
Rnd 3. inc, 3 sc, 3 inc, 3 sc, 2 inc (18)
Rnd 4. 7 sc, 3 inc, 8 sc (21)
Rnd 5. BLO, 21 sc (21)
Rnd 6. 7 sc, 3 dec, 8 sc (18)
Rnd 7. 4 sc, 4 dec, 6 sc (14)
Rnd 8. 2 sc, 4 dec, 4 sc (10)
Rnd 9. (3 sc, dec)x2 (8)
Continue on with white.
Rnd 10. 8 sc (6 rounds) (8)
Stuff only half of the legs.
Continue on with beige.
Rnd 11-15. 8 sc (5 rounds) (8)
Rnd 16. Only 5 sc. Do not stuff of the legs. Press the opening with your fingers, aligning 3 stitches side by side. Break the yarn and leave a long tail to sew legs to body.

Skirt
Turn the doll upside down, so the head is pointing down. With blue yarn to crochet skirt around the body, begin from the front loop of body’s R13.
Rnd 1. 36 sc (36)
Rnd 2. 36 inc (2 dc in one loop) (72)
Rnd 3. 72 inc (2 sc in one loop) (144) Close. Break the yarn and weave in ends.
Curls x2
Start working with yellow yarn.
Rnd 1. 45 ch, starting from second ch from hook, sc, 42 hdc, sc (44)
Leave a long tail.
Finishing
• Sew the legs to the body.
• Sew the arms to the body symmetrically.
• Sew collar and bow.
• Sew the hair to the head.
• Sew Bun Caps and Curls to hair.
• Sew yellow lines and red crystal between curls.

Congratulations, you have completed the amigurumi Sailor Moon pattern.
More Amigurumi Doll Ideas:
