Hello dear Amigurumi Followers
Today we share Amigurumi Crochet Deer Free Pattern for you. As you know we share new free amigurumi pattern every day. The main crochets are gazelle, amigurumi bear, pola, crochet panda, penguin, giraffe, llama, pig, bunny, clown, lamb, bee, crochet unicorn, amigurumi doll, fox, penguin, dinosaur, crochet elephant, hippo, monkey, crochet cat, crochet dog and more …
Todays daily new amigurumi free crochet pattern is Amigurumi Crochet Deer.
I want to give you some informations about this amigurumi free pattern ; Crochet Deer.
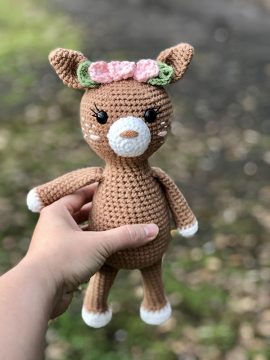
Materials –
- Size 4 worsted weight yarn
- 150g brown
- Small amount of white, pink and green
- 3.5 mm crochet hook (these are the hooks I use and love!)
- 12mm safety eyes
- Black crochet/embroidery thread for the eyelashes/eyebrows
- Scissors
- Tapestry needle (bent tips work great for amigurumi!)
- Stuffing
- Stitch markers
- Pins (optional)
Abbreviations – US terminology
SC- Single crochet
SC INC- Single crochet increase
INV DEC- Invisible decrease
HDC- Half double crochet
DC – Double crochet
TR – Triple crochet;
Ch – Chain
Rep – Repeat
St(s) – Stitch(es)
Notes –
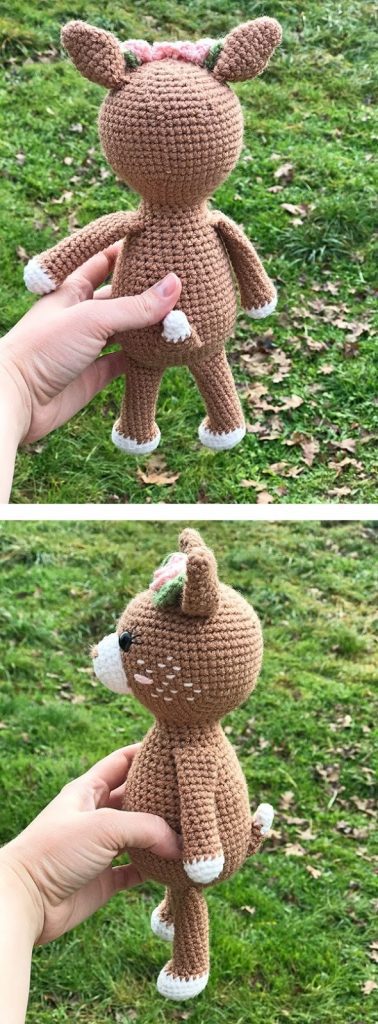
- The above fawn measures 14 inches tall. Difference in tension, yarn or hook size may produce a slightly taller or shorter finished product.
- Slowly stuff as you go, you want it to be firm but not stretched. You will be working in a continuous round; I recommend using a stitch marker at the beginning or end of each round.
- For this pattern the body and head will be made as one piece.
Amigurumi Crochet Deer Free Pattern
Nose –
With white
Round 1: Create a magic circle with 6 SC
Round 2: SC INC in each stitch (12)
Round 3: SC in the first stitch, SC INC in the next, rep around (18)
Round 4: SC in the first 2 sts, SC INC in the next, rep around (24)
Rounds 5-6: SC around (24)
Fasten off leaving a long tail for sewing.
With your brown yarn and tapestry needle; create a nose by passing your yarn through 3 stitches between round 3 and 4.

Body-
With brown
Round 1: Create a magic circle with 6 SC
Round 2: SC INC in each stitch around (12)
Round 3: SC in the first stitch, SC INC in the next, rep around (18)
Round 4: SC in the first 2 sts, SC INC in the next, rep around (24)
Round 5: SC in the first 3 sts, SC INC in the next, rep around (30)
Round 6: SC in the first 4 sts, SC INC in the next, rep around (36)
Round 7: SC in the first 5 sts, SC INC in the next, rep around (42)
Round 8: SC in the first 6 sts, SC INC in the next, rep around (48)
Rounds 9-15: SC around (48)
Round 16: SC in the first 6 sts, INV DEC in the next, rep around (42)
Round 17-18: SC around (42)
Round 19: SC in the first 5 sts, INV DEC in the next, rep around (36)
Rounds 20-21: SC around (36)
Round 22: SC in the first 4 sts, INV DEC in the next, rep around (30)
Rounds 23-24: SC around (30)
Round 25: SC in the first 3 sts, INV DEC in the next, rep around (24)
Rounds 26-27: SC around (24)
Round 28: SC in the first 2 sts, INV DEC in the next, rep around (18)
Rounds 29-30: SC around (18)
*We will now start the head*
Round 31: SC in the first 2 sts, SC INC in the next, rep around (24)
Round 32: SC in the first 3 sts, SC INC in the next, rep around (30)
Round 33: SC in the first 4 sts, SC INC in the next, rep around (36)
Round 34: SC in the first 5 sts, SC INC in the next, rep around (42)
Round 35: SC in the first 6 sts, SC INC in the next, rep around (48)
Round 36: SC in the first 7 sts, SC INC in the next, rep around (54)
Rounds 37-45: SC around (54)
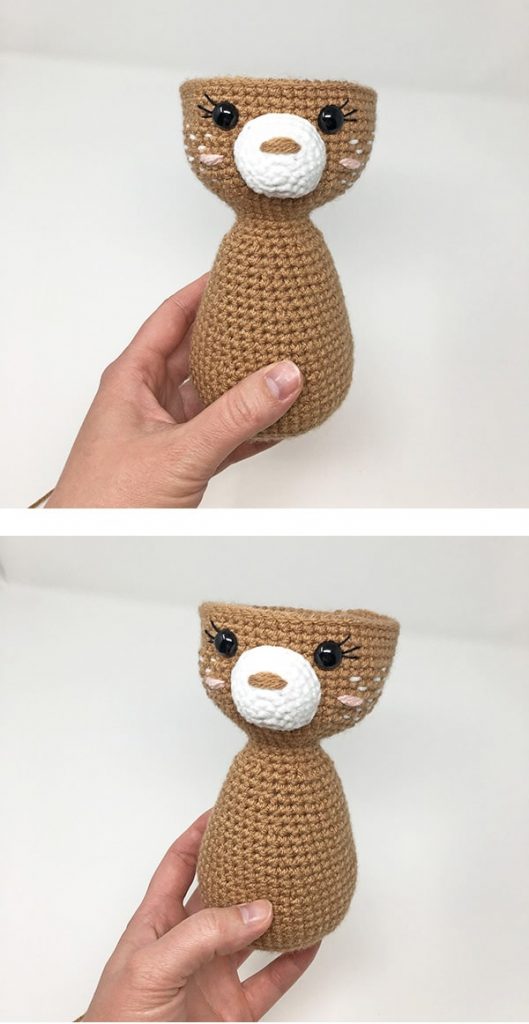
Note: Here is where we will add the facial features before we start closing the head. (If you would like eyelashes/eyebrows I recommend sewing them in place before securing the back onto your safety eyes.) Insert the eyes between rows 42 and 43, 7 stitches apart.
Next, sew your nose centered between the eyes slowly stuffing as you go.
Cheeks – With a piece of pink yarn and your tapestry needle pass your yarn through 2 stitches on either side of your nose piece to create the cheeks. Then, with your white yarn create additional passes through random stitches around your cheeks for added detail.
Round 46: SC in the first 7 sts, INV DEC in the next, rep around (48)
Round 47: SC in the first 6 sts, INV DEC in the next, rep around (42)
Round 48: SC in the first 5 sts, INV DEC in the next, rep around (36)
Round 49: SC in the first 4 sts, INV DEC in the next, rep around (30)
Round 50: SC in the first 3 sts, INV DEC in the next, rep around (24);
*Continue to stuff the head firmly
Round 51: SC in the first 2 sts, INV DEC in the next, rep around (18)
Round 52: SC in the first stitch, INV DEC in the next, rep around (12)
Round 53: INV DEC around (6)
Fasten off and sew remaining part closed, weave in your end.
Ears –
Make 2 with brown
Round 1: Create a magic circle with 8 SC
Rounds 2-3: SC around (8)
Round 4: SC in the first stitch, SC INC in the next, rep around (12)
Round 5: SC around (12)
Round 6: SC in the first 2 sts, SC INC in the next, rep around (16)
Rounds 7-10: SC around (16)
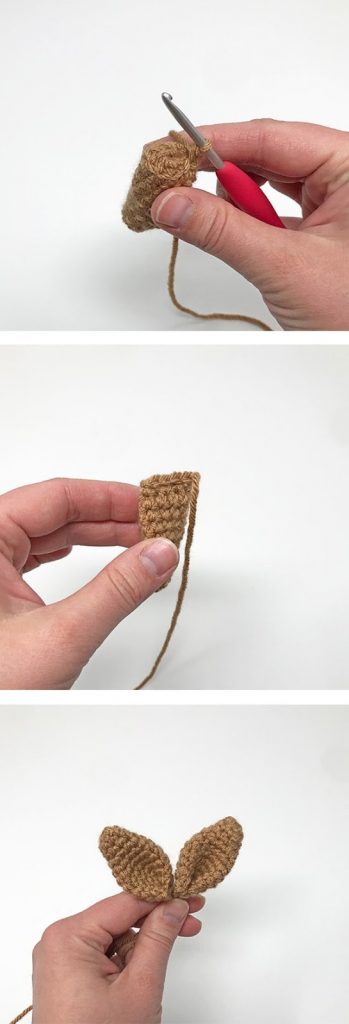
Fold ear in half and SC across the top as pictured below, then fasten off leaving a long tail for sewing.
Arms-
Make 2 starting with white
*Lightly stuff the bottom of the arms only*
Round 1: Create a magic circle with 6 SC
Round 2: SC INC in each stitch around (12)
Round 3: SC in the first 3 sts, SC INC in the next, rep around (15)
Round 4: SC around (15)
Change to brown
Round 5: SC around (15)
Round 6: SC in the first stitch, INV DEC in the next, repeat around (10)
Rounds 7-18: SC around (10)
At the end of round 18 pinch the arm flat and make 5 SC across the top to close, fasten off and leave a long tail to sew onto the body.
Legs –
Make 2 – Stuff firmly
With white
Round 1: Create a magic circle with 6 SC
Round 2: SC INC in each stitch (12)
Round 3: SC in the first stitch, SC INC in the next, rep around (18)
Round 4: SC in the first 2 sts, SC INC in the next, rep around (24)
Round 5: SC around in the back loops only (24)
Round 6: SC around (24)
Round 7: SC in the first 6 sts, INV DEC 6 times, SC in the last 6 sts (18)
Round 8: SC in the first 3 sts, INV DEC 6 times, SC in the last 3 sts (12)
Change to brown
Rounds 9-21: SC around (12)
Fasten off and leave a long tail to sew onto the body.
Tail –
(Do not stuff)
With white
Round 1: Create a magic circle with 6 SC
Rounds 2-3: SC around (6)
Round 4: SC in the first stitch, SC INC in the next, rep around (9)
Change to brown
Rounds 5-6: SC around (9)
Round 7: SC in the first 2 sts, SC INC in the next, rep around (12)
Round 8: SC around (12)
Fasten off and leaving a long tail for sewing.

Floral Crown –
Small Flower – Make 3
Make a magic circle, complete the following inside: 2 DC, slip stitch (this completes one petal, repeat 4 more times for a total of 5 petals)
Pull the circle tight and slip stitch to the first petal to close, fasten off leaving a long tail for sewing.

Leaves – Make 2
Round 1: Complete the following inside of a magic circle; SC, HDC, DC, TR, Ch 1, TR, DC, HDC, SC. Pull tight to close and slip stitch to the first SC.
Fasten off leaving a long tail for sewing.

Assembly –
1. Sew the ears onto either side of the head at the 6th round.
2. Next, sew on the arms at round 26.
3. Third, attach the legs covering a span of about 6 rounds. I sewed mine from rounds 2-7. Be sure each foot is facing forward as you sew. (Note: For firmer legs add a little bit of stuffing just before finishing.)
4. Almost done! Next, sew the tail onto the bottom center of the back. I sewed along the bottom of the tail as well as 1 stitch up on each side to help hold its shape in an upward position.
5. Lastly, sew your flowers and leaves between the ears. Optional – Using pins to hold each piece in place will help in finding the desired location before sewing.
