Hello dear Amigurumi Followers
Today we share Amigurumi Lovely Raccoon Free Pattern for you. As you know we share new free amigurumi pattern every day. The main crochets are gazelle, amigurumi bear, pola, crochet panda, penguin, giraffe, llama, pig, bunny, clown, lamb, bee, crochet unicorn, amigurumi doll, fox, penguin, dinosaur, crochet elephant, hippo, monkey, crochet cat, crochet dog and more …
Todays daily new amigurumi free crochet pattern is Amigurumi Lovely Raccoon.
I want to give you some informations about this amigurumi free pattern ; Lovely Raccoon.

SOME RULES:
• For any copying of material, publications in the community, etc., be sure to indicate the author with reference to the source.
• You can not translate or modify the MC and distribute it under your own name.
• You can donate, sell and generally use for any purpose ready-made toys (I will be very grateful for the attribution of authorship MK).
• The difficulty level is easy, but some experience is needed.
• When using these materials, the toy is about 16 cm.
INSTRUMENTS AND MATERIALS:
Yarn yarn art jeans gray (46), white (01) and black (53) yarn;
• GAZZAL Yarn Yarn Cotton black (3433) and white (3432) colors for the eye;
Note: you can use Jeans yarn, but then take the hook smaller number, knit tight, perhaps the eyes will be slightly larger.
• hook №2, № 1,5;
• needle for stapling parts;
• 8 mm plastic eyes with a white rim;
• Holfoil filler.
CONVENTIONAL SYMBOLS:
‘
• Вп – air loop
• sbn – column without crochet
• foam – half-shell with crochet
• pr-supplementation
• уб – reduction
• All – connecting bar

Amigurumi Lovely Raccoon Free Pattern
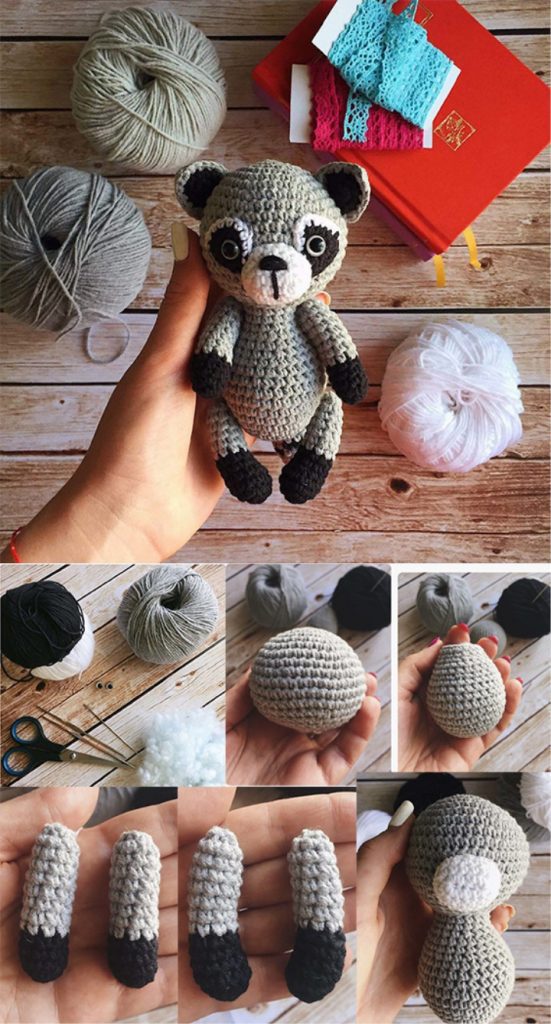
HEAD:
We knit in gray
1 p. 6 in the ring amigurumi
2p. 6 increases (12)
3p. (1sbn, pr) * 6 (18)
4p. (2sbn, pr) * 6 (24)
5p. (3sbn, pr) * 6 (30)
6p. (4 sb, pr) * 6 (36)
7p. (5bn, pr) * 6 (42)
8-9p. (2 rows) without change
10r. (6 sbn, pr) * 6 (48)
11-13r. (3 rows) without change (48)
14r. (6сбн, уб) * 6 (42)
15r. (5сбн, уб) * 6 (36)
16r. (4сбн, уб) * 6 (30)
17r. (3сбн, уб) * 6 (24)
18p. (2сбн, уб) * 6 (18)
We fix the thread, leave a long tip for sewing. Filling detail, give it a beautiful shape.

BODY:
We knit in gray
1 p. 6 in the ring amigurumi
2p. 6 increases (12)
3p. (1sbn, pr) * 6 (18)
4p. (2sbn, pr) * 6 (24)
5p. unchanged (24)
6p. (3sbn, pr) * 6 (30)
7p. no change (30)
8p. (4 sb, pr) * 6 (36)
9-10r. (2 rows) unchanged (36)
11 r. (4сбн, уб) * 6 (30)
12-13r. (2 rows) without changes (30),
14r. (3сбн, уб) * 6 (24)
15-16r. (2 rows) unchanged (24)
17r. (2сбн, уб) * 6 (18)
18-19r. (2 rows) unchanged (18)
We fill the part in the course of knitting, fix the thread.

HANDS (2 DETAILS):
We fill the details densely in the course of knitting. We knit with black color
1 p. 6 in the ring amigurumi
2p. (sb, pr) * 3 (9)
3-5p. (Rampage) without changes (9)
Change the thread to gray
6-13 r. (8 rows) unchanged (9)
9p. 4 ub, gently pull the hole.

LEGS (2 DETAILS):
We fill the parts tightly along the way knitting. We knit with black color
1 p. 6 in the ring amigurumi
2p. 6 increases (12)
3r. unchanged (12)
4p. 3 ub, 6sbn (9)
5-6 r. (2 times) unchanged (9)
change the thread to gray
7-13 r. (7 rows) unchanged (9)
14p. 4 ub, gently pull the hole.

MALE:
1 p. We knit a chain of 5 bp, then in the second loop from the hook pr, 2 sb, 4 sb in one loop, then on the back of the chain 2 sbn, Ave (12)
2p. sbn, pr, 2 sb, (sb, pr) * 2p, 3 sbn, etc. (16)
3-4 r. unchanged (16)
5p. we knit a half of the row 8sbn, ce, thread fix, leave a long tip for sewing.


EARS:
The eyelet consists of two parts, one of which in black, the second in gray.
1 p. 6 in the ring amigurumi
2p. (sb, Zsbn in one loop)
* W, ce, thread secure First we knit a black part, cut the thread, then the gray part, we do not do it, the thread does not cut, turn the gray part the wrong side to yourself, add up with a black together with each other sides inward, and bind them with sulfur thread:
4p. 4 sb, (sb, pen, sb) in one loop, 4sbn, fix the thread, leave a long tip for sewing. Cropped thread tips we refill the ear. Similarly, we knit the second ear.


EYES:
We knit GAZZAL Cotton Cotton, hook 1.5 Black color.
1 p. 5сбн in a ring amigurumi, but we do not close, вп, further turning rows
2p. 2сбн, Зсбн in one loop, 3 сбн, вп, turn knitting • •
3p. 3 sb, Zsbn in one loop, 3 sb, further we knit on the lower edge of our triangle 5cbn, se. These are the triangles that we still have to tie a white color. Since we have the right and left eyes, we tie them in different ways. Right start to bind from the top of the triangle (where we are made 3 sb in one loop) along the left edge 5bn, 2sbn in one loop in the corner and go down the lower edge of 5 sb (12), fix the thread, leave long tip for sewing The left we begin to tie off the corner of the lower rib 5 sb, 2 sb in one loop on the corner, 5 сбн on the right edge (12), fix the thread, leave long tip for sewing Insert the eyes into the center of our amigurumi ring, fix it with the back side.

TAIL:
White color
1p. 6 in the ring amigurumi
2p. without changes (6)
3p. (sb, pr) * 3 (9)
4p. (2сбн, пр) * З (12)
5p. unchanged (12)
Gray color
6r. (Зсбн, пр) * З (15)
7p. unchanged (15)
Black color
8p. unchanged (15)
Gray color
9-1 Ohr. (2 rows) unchanged (15)
Black color
11 r. unchanged (15)
Gray color
12r. unchanged (15)
13p. (3bb, yb) * 3 (12)
14r. (2сбн, уб) * З (9)
We stuff the part loose in the course of knitting, the last 2-3 rows are not packed at all, fold the piece in half and connect the 4 rolls, fix the thread, leave a long tip for sewing


ASSEMBLY:
1. Sew our head to the body.
2. Sew our muzzle, stuff it. The upper edge of the muzzle is approximately after the 11th row of the head. We sew so that our 5 half-length is below.
4. Sew our eyes. Do not confuse the right and left! Pin with pins, so that the parts do not budge, the protruding rods on the plastic eyes just deepen the inside of the head. Sew on the white straps white thread, lower black edges of the eyelet sewn with a black thread.
5. Sew the ears. Arrangement of ears approximately 4 rows from the top of the head.
6. Handles and legs will be MOBILE. For this we use a thread holder. Pens fasten approximately between 17 and 18 body series, legs between 7 and 8 next. I make the thread fastening like this: In one of the legs I take out the thread in place (I usually bring it out at the stage tightening the hole on the foot), I inject a needle in the place of attachment of the leg on the body and remove it on the other hand symmetrically, pulling foot. I pick up the second leg with a needle for 1-2 and insert the needle back into the place of withdrawal, on the reverse side again strictly in the The same place where I injected a needle, I grab 1-2 loop of the first leg and again I enter and deduce or remove from the reverse side at the same point. So I repeat 2-3 times. Then I fasten the thread to one of the legs, I hide the tip in the body. The same thing I do with the pens.
7. The tail is sewn approximately at the level between 6 and 7 near


